If your evaporative cooler has started pumping out eau de swamp, your nose is not being dramatic. Swamp coolers move a lot of air across wet pads, then dump that air into your home. If the water gets funky, the pads get crusty, or the ducts get leaky, your cooler becomes a must-machine. The good news: you can keep the chill without the mildew by focusing your swamp cooler maintenance on sizing, airflow, purge cycles, pad choice, make-up air, duct sealing, and off-season cleaning. Let’s turn your swamp cologne into crisp desert breeze.
Why Swamp Coolers Go Musty
Evaporative cooling is simple physics: dry air meets water, water evaporates, air cools. It’s also simple biology: where you have water, warmth, and a little time, you get microbial growth. Pads, distributor tubes, and sumps collect minerals as the water recirculates. That buildup creates dry-wet pockets where mold and bacteria get comfy. Then the blower sends their little party favors all over the house. If humidity indoors climbs above about 60 percent, mold growth accelerates on building materials too, not just in the cooler.
On top of that, ducts can be fantastic mold highways if they get dirty or leak into hot attics and wall cavities. If you’re smelling musty air when your cooler kicks on, check the cooler first, then the ducts and the rooms the air is actually touching. We cover hidden HVAC mold risks here: Places To Look For Hidden Mold In Your Home. And since water quality shapes how evenly pads wet and how fast crud piles up, grab ideas from our cooler hygiene guide: Evaporative Cooler Hygiene Made Easy.
Sizing And Airflow That Work
Evaporative coolers shine when they are sized for the space and actually move air through the house, not just around it. Too small and you get weak airflow and damp corners. Too big and you flood your home with moisture while chilling like a walk-in salad bar. Either way, you raise the odds of funky smells and mold-friendly conditions.
Quick Sizing Math
There’s an easy rule used by installers: take your home’s cubic feet and divide by 2 to get a target CFM. For example, a 1,600 square foot home with 8-foot ceilings has 12,800 cubic feet. 12,800 divided by 2 equals 6,400 CFM. That’s your ballpark. Taller ceilings, open floor plans, solar heat gain, and hot attics may nudge you upward, but resist the urge to jump two sizes just because you like cold. Oversizing can raise indoor humidity and turn your living room into a greenhouse with furniture.
A Clean Path From Inlet To Exhaust
Swamp coolers are supply-only systems. That means the fresh, cool air needs a way out so new air can keep flowing in. If the house is sealed like a submarine, you just build pressure, stall airflow, and end up with clammy rooms. Crack windows on the far side of the house from the main supply vents. Use doors and hallways to create a path so the air sweeps through rooms before exiting. On two-story houses, put openings where you actually want the air to pass, not right next to the cooler’s supply. If you have a whole-house exhaust vent or a few strategic bath or laundry exhaust fans, use them to encourage flow out of high-humidity areas. Just do not exhaust right where the cooler is drawing air back in, or you’ll recirculate wet air like a hamster on a wheel.
Purge Cycles And Water Quality
Recirculated water concentrates minerals. Minerals cause scale. Scale causes uneven wetting and slow drips that keep pads damp after the pump stops. Mix in a little dust and pollen and you have a snack bar for microbes. Bleed-off and purge cycles are the fastest way to keep water fresh and pads evenly wet. Many coolers support automatic bleed-off kits that dump a small portion of sump water continuously or at intervals, then refill with fresh water. You can also open the drain manually on a schedule if you’re working with a basic unit.
A cheap TDS meter helps you make this smarter. Measure your tap water, then measure the sump. When sump TDS climbs to roughly 2 to 3 times your tap level, purge. In very hard water areas, that can happen quickly, so an automatic system saves you from babysitting the drain plug. You’ll also want to clean distributor tubes and the water spreader so every square inch of pad gets evenly wet. Our hygiene walkthrough with TDS tips is here: Evaporative Cooler Hygiene Made Easy.
Overwatering Is Not Cooling
More water does not equal more cooling. Pads should be fully wet during operation, but not waterfalling. If water pours off the pads, you are just feeding microbial growth and sending mineral slurry into your sump. Dial in the float level and pump rate so the pad is saturated but not dripping heavily. If you see dry bands or edges, you have a distribution problem that needs cleaning or adjustment, not more water.
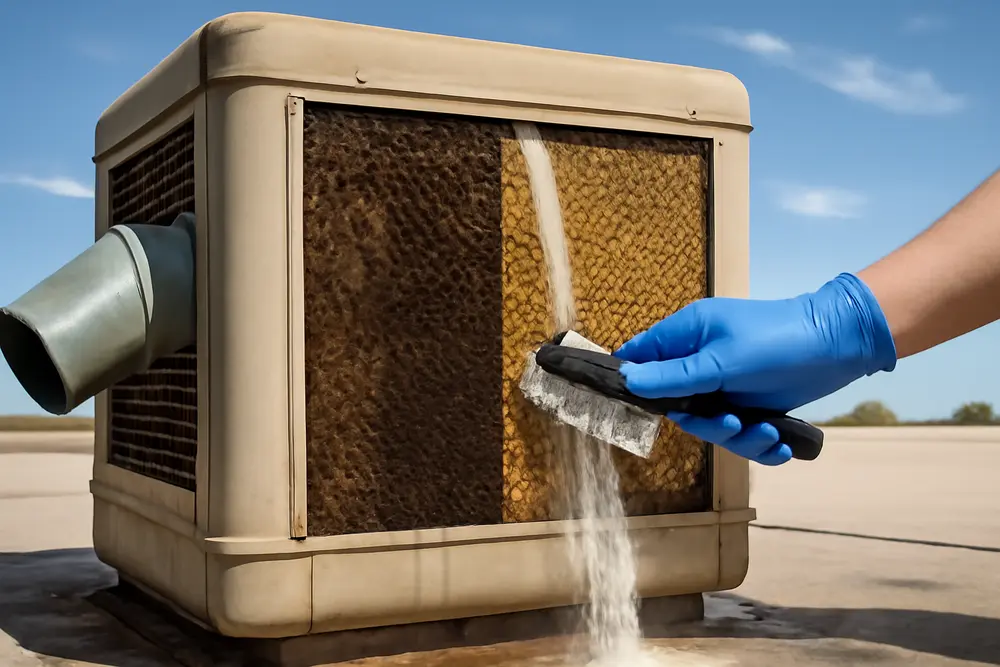
Pick Better Pads
Pad material matters. Aspen pads are cheap and cool well when new, but they clog fast in hard water, shed fibers, and develop channels that leave dry zones. Rigid or synthetic pads, often the blue or green mesh types or thick cellulose media, resist scale, keep shape, and distribute water more evenly. They cost more but they last longer and tend to smell less grody under the same water quality. If you’re trying to push evaporative cooler mold mitigation without daily drama, better pads are worth it.
During install, flush new pads to knock off loose dust. Make sure the water distributor is clean and the drip holes are not blocked. If you’re running multi-panel coolers, match pad types and thicknesses so airflow and wetting are even across all panels. Uneven pads mean one side goes swampy while the other runs dry, and your home gets half-cooled, half-damp air. That’s a musty two-for-one nobody asked for.
Signs A Pad Has Retired
Replace pads if they smell musty even after a purge and dry-out, if they are channeling water down grooves instead of across the face, if they crumble or shed, or if air velocity through the pad has obviously dropped. In hard water regions, even good pads may be yearly items. Rigid media can go longer, but check them at the start and midpoint of the season. If you can’t get even wetting after cleaning the distributor, it is time.
Make-Up Air And Venting
Make-up air is the air you invite in to replace the cooler’s output. Without it, humidity builds and air goes stale. The trick is balancing where you open the house so the new cool air sweeps across heat loads, then exits. Large openings near the end of the airflow path help keep humidity from pooling in middle rooms. If you only crack the nearest window, the air takes the easy way out and leaves bedrooms and back rooms muggy. Think path, not spot. Bedrooms need an exit if you want them cool at night. Hallway doors can be propped a few inches to let air pass, and one or two windows at the far end of the house can act like pressure relief valves.
Check that attic bypasses around registers are blocked and that return paths do not dump into wall cavities. If the cooler is roof-mounted, make sure the roof jack and transition are airtight, so your positive pressure sends air into rooms, not into the attic where it condenses on dusty framing. That dust plus a hint of moisture equals attic funk. The smell has a way of finding your nose later.
Seal Leaky Ducts
You can do everything right at the cooler and still get musty air if your ducts are leaking or dirty. Leaky ducts pull in attic dust and humidity, then send that into your home. They also dump your cool air into spaces you do not occupy. That wastes water, electricity, and patience. Inspect metal seams and flex connections. Seal with mastic or UL 181 foil tape, not cloth duct tape, which fails in hot attics. Insulate ducts running through attics to limit condensation and heat gain. If your supply boots are loose at the ceiling, seal the gaps so you do not pressurize the attic with the very air you want in your living room. We talk about hidden HVAC mold risks inside ducts here: Hidden Mold In Your Home.
While you are there, pop a register and peek inside with a flashlight. If you see visible dust mats, stuck pet hair, or suspicious gray fuzz clinging to liner, schedule a cleaning with a pro who knows how to handle duct materials without shredding them. Do not spray random biocides. If there is actual mold, you want targeted remediation, not a perfume cannon.
Off-Season Cleaning
At the end of cooling season, your goal is to make the cooler a bad place for anything to grow. Drain the sump, remove pads, and scrub scale from the sump and water distribution parts. A mild descaler or diluted white vinegar helps on mineral edges. Rinse thoroughly. Let the interior dry before you button it up. Store the unit with a breathable cover, not a plastic bag that traps moisture. Disconnect the water supply and make sure the float valve is not stuck partially open. If your cooler has a built-in damper, close it so winter air does not whistle into the house. If it does not, use a magnetic cover or a tight register damper to stop cold drafts.
Right before the next season starts, open it up and inspect. Replace pads if they look dicey. Clean the distributor, check the pump, confirm the bleed-off or purge device functions, and run a short test. You want even wetting across all pads and a steady, not raging, flow back to the sump. Any leaks at fittings or panel edges should be fixed before you soak the roof.
Startup Checklist
Here is a tight pass-fail list for spring:
- Pads wet evenly during operation and do not heavily drip
- Sump water is clear, bleed-off or purge works as designed
- No visible scale blocking distributor holes or return channels
- Duct connections are sealed and insulated where needed
- Windows or vents are cracked to create a real airflow path
- Indoor humidity stays under roughly 60 percent during use
Still Smells Musty?
Run through the basics above. If the odor persists, measure indoor humidity with a small hygrometer in multiple rooms. If RH is pushing past 60 percent when the cooler runs, you are overcooling with moisture or you are not exhausting enough air. Try opening additional windows farther from the supply, turn down the water flow, or shorten run time during muggy afternoons. On unusually humid days, it may be smarter to shut the swamp cooler off and switch to AC or use spot cooling instead of marinating your drywall.
If the cooler is clean, the pads are new, and the air path is right, the smell could be coming from duct interiors, wall cavities near leaky ducts, or damp building materials from unrelated leaks. That is when professional inspection makes sense. We use moisture meters, cameras, and targeted sampling when needed to figure out where the stink actually starts. If your nose says swamp and your cooler looks pristine, the problem may be hiding in plain sight somewhere else.
Frequently Asked Questions
How often should I change swamp cooler pads?
In hard water regions, plan on yearly for aspen and 1 to 3 years for rigid or synthetic pads, depending on water quality and how you run the unit. If you see channels, smell must, or notice uneven wetting that does not improve after cleaning the distributor, replace them. Cheap pads cost you later in odor, minerals, and airflow.
What is a good TDS goal for purge cycles?
Use your tap water as baseline. When the sump reads about 2 to 3 times your tap TDS, purge and refill. That keeps minerals from crusting pads and reduces the chance of damp-dry pockets that grow stuff. An automatic bleed-off kit makes this simpler if your water is very hard.
Do evaporative coolers cause mold in ducts?
They can contribute if ducts are dirty, leaking, or run through very hot spaces without insulation. Humid air plus dust on duct liners is a recipe for funky odors. Seal leaks with mastic or foil tape, insulate attic runs, and keep the cooler clean. If you suspect growth, get a trained inspector to scope it rather than spraying mystery chemicals.
How much should I open windows for make-up air?
There is no single square-inch rule that fits every house. The goal is a clear path from supply to exit so air keeps moving. Crack windows or doors on the opposite side of the house from the supply registers and adjust until rooms feel breezy rather than clammy. If opening only one small window, the air will short-circuit and leave the rest of the house muggy.
Can I add a dehumidifier with a swamp cooler?
It is usually a tug-of-war, because a dehumidifier adds heat while removing moisture. On rare extra-humid days, you might get some benefit in specific rooms, but most of the time it is more efficient to improve airflow or switch cooling modes for that period. If your indoor RH sits high regularly with the cooler on, revisit sizing, purge cycles, window openings, and duct sealing first.
Proper Swamp Cooler Maintenance Tips
Keep your cooler tuned like a daily driver, not a weekend project car. Size it right for the cubic footage you are cooling. Move air through the house, not just into it. Purge the water so minerals do not turn pads into chalky sponges. Pick pads that keep shape and resist scale. Create make-up air paths that actually pull humidity out, and seal ducts so your cool air does not fund attic mold retirement. Finish strong with off-season cleaning and dry storage. That is evaporative cooler mold mitigation that works in the real world, without turning your summer into a maintenance marathon.
If you are fighting stubborn odor or mystery humidity, we can help you figure out whether the culprit is the cooler, the ducts, or something else entirely. Book a targeted mold inspection or testing visit and we will track the problem to its source so you can get your cool back without the must.