
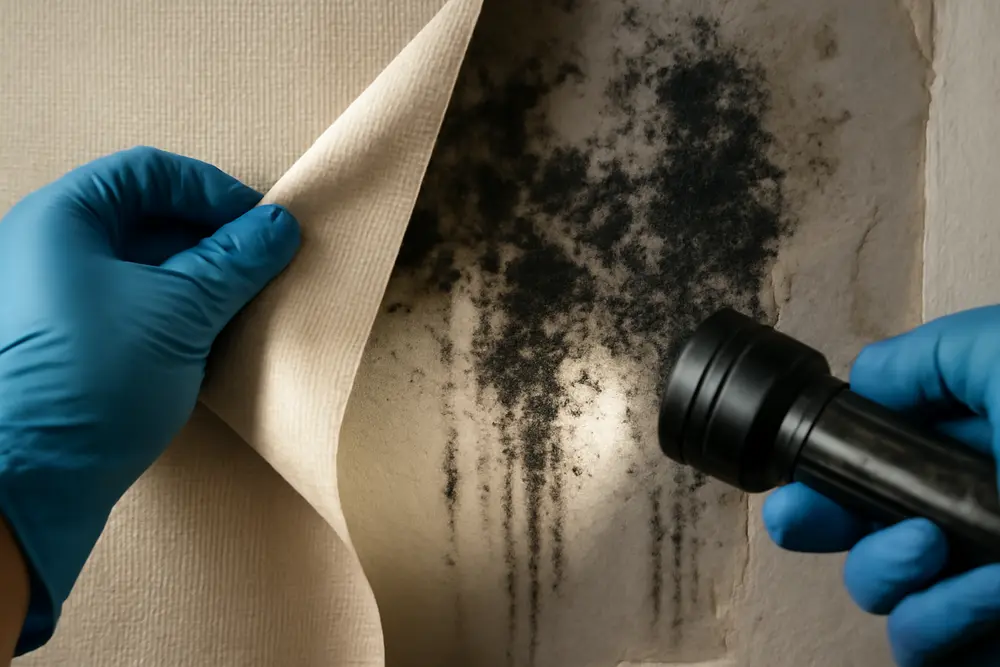
If vinyl wallpaper had a dating profile, it would say low-maintenance, easy to clean, and loves long showers. And that is exactly the problem. Vinyl wallcoverings look tough, but their superpower is also their villain arc: they block moisture vapor transmission. When water vapor can’t escape, it sneaks behind the pretty face and turns your wall into a slow cooker for mold. You might not see a single spot up front while a fuzzy science fair is brewing behind the seams. If you’ve got vinyl on an exterior wall or in a steamy bathroom, you’re running a moisture trap. Let’s talk about what vinyl actually does to your walls, how to spot early clues without ripping your place apart, and what to use instead so your walls can breathe like they were born to.
What Are Vinyl Wallcoverings?
Vinyl wallcoverings are decorative finishes that use polyvinyl chloride as a durable, wipeable surface. You’ll see a few common flavors: solid vinyl sheets, vinyl-coated papers, and vinyl laminated to fabric or paper backings. Designers love them in bathrooms, hotel corridors, and kitchens because they resist stains and can handle aggressive cleaning. They also get slapped onto exterior-facing walls that take a beating from sun and weather because vinyl looks like a safe, rugged choice.
The catch is in how vinyl behaves with water vapor. Unlike traditional paper or non-woven wallpapers, vinyl is highly resistant to vapor diffusion. That low permeance is why you can scrub it without turning it into mush. It’s also why it can act like a plastic bag on your wall.
Why Does Vinyl Trap Moisture?
Moisture vapor transmission, often shortened to MVTR or WVTR, is how easily water vapor passes through a material. In building science, we talk about vapor permeance measured in perms. Lower number means lower vapor flow. Vinyl wallcoverings typically land in the very low range, which puts many products in Class I or Class II vapor retarder territory. Translation: once moisture gets behind vinyl, it struggles to dry out. Guidance on this comes from building science pros who warn that vinyl wallcovering behaves like a vapor barrier, especially in hot-humid climates or in rooms that generate a lot of moisture like bathrooms and spas. See overviews on moisture management from WBDG and notes on vinyl permeability from IPS Perforating.
Here is how the trap gets set. Air-conditioned interiors cool your drywall. Outdoors in summer, humid air pushes water vapor inward. On shower days, indoor humidity spikes. That vapor wants to go from more to less, so it tries to move through your wall assembly. When it hits a cool surface behind vinyl, it can condense on the substrate like gypsum. Impermeable primers under that vinyl make it even worse by creating a double-retarder sandwich. The moisture lingers, and if the substrate is paper-faced gypsum or wood, you have mold food plus water plus comfortable temperatures. That is basically the mold version of room service.
Researchers have tested different wallpapers and found that coverings with higher permeability and good moisture storage capacity delay or limit mold growth compared to low-permeance finishes. You can see this in building physics studies on wallpaper sorption and permeability published in peer-reviewed work such as Energy and Buildings. Manufacturers in the wallcovering world also measure MVTR to compare how quickly vapor diffuses. Vinyl often clocks in with very low MVTR, which is fantastic for cleaning and terrible for drying. If you want a primer, this water vapor overview walks through diffusion basics in plain English.
Early Clues Before You Rip It Down
You do not have to go full demolition to sniff out a vinyl-related mold problem. The wall will tattle if you listen closely. Start with your nose. A musty, earthy smell that seems to live at nose-height near seams, corners, or at the baseboard is a classic red flag. Your eyes are next. Look for bubbling, blistering, or peeling in the wallpaper, especially where seams meet, near shower walls, by exterior corners, and anywhere sunlight cooks the wall during the day. Discoloration that looks pinkish, yellowish, or tan mapping through the vinyl is another strong clue that moisture is migrating behind the face. Our printable Mold Clues checklist hits the greatest hits like warped paint or lifting seams. You can grab it here: Howard Environmental Mold Checklist.
Your body can also be an early warning system. If allergies or asthma flare inside but calm down outside, the building may be feeding the problem. Keep an inexpensive hygrometer indoors and watch the relative humidity. If it regularly runs above 60 percent, your space is in the mold comfort zone. Condensation on windows or that sticky feeling after a shower that never dissipates means ventilation is slacking. Pay attention to baseboards and outlet plates too. If they feel cool and clammy or show rust on the screws, moisture is passing through the wall and stopping at the vinyl face.
Pro tip from the field: a simple infrared camera plus a pinless moisture meter can often map the wet zone without a single cut. Cold blotches in consistent shapes, particularly vertical bands on exterior walls or warm-season mornings after a humid night, are screaming condensation. We use these tools to pick the smallest, smartest test cuts so you are not Swiss-cheesing your home.
Risk Hot Spots To Check
Exterior walls on the sunny side get hammered by solar vapor drive in summer, which can push moisture inward against cool, air-conditioned drywall. Bathrooms are high on the list because showers spike humidity daily, and the vinyl face slows drying between cycles. Laundry rooms, spa rooms, and any area where a steam generator or humidifier runs will ramp up risk. Behind large furniture, mirrors, or cabinets where air cannot circulate is another favorite. If vinyl covers those walls, you are basically wrapping the cavity in a raincoat and then asking it to breathe through a straw.
Better Finishes That Let Walls Dry
If you are picking finishes or planning a remodel, you can keep the easy-clean vibe without building a mold motel. The simplest move is to choose vapor-open finishes wherever possible, especially on exterior walls and in bathrooms that do not have tiled wet zones. Traditional non-woven or paper wallpapers breathe more readily than vinyl. There are also microvented or perforated vinyl wallcoverings that significantly increase vapor diffusion by adding tiny holes you barely notice visually. Building science and manufacturers both support this direction. See options and permeability notes at IPS Perforating, and the role of permeability in mold delay in the Energy and Buildings study mentioned earlier.
Paint can be your friend if you pick the right chemistry. Quality latex paints and vapor-open primers let walls dry while still standing up to cleaning. Skip oil-based or epoxy primers under vinyl. That pairing creates a double barrier and doubles your odds of trapping moisture. Wallcovering suppliers also warn against impermeable undercoats beneath vinyl, as it reduces adhesion and prolongs drying. For example, application guides from major brands like Versa call for compatible primers and adhesives suited to the site conditions, not just the lookbook.
On the adhesive front, go with products designed for humid environments that do not choke diffusion. Many clear adhesives are formulated for paste-the-wall or paste-the-paper installs and offer better release for future removal. Look for low-VOC, mold-resistant language and avoid turning your wall into a laminated plastic sheet with multiple impermeable layers. Your goal is simple: allow inward or outward drying based on climate and assembly, as covered in WBDG moisture strategies.
Ventilation That Actually Works
The best wall finish still loses to bad ventilation. If you treat your bathroom fan like decoration, moisture will collect and go hunting for a cold surface behind that vinyl. Size your bath exhaust to roughly 1 CFM per square foot of floor area for typical 8-foot ceilings, and run it long enough to matter. Twenty to thirty minutes after showers is a good baseline. Add a timer switch so teenagers do not sabotage the plan. Doors need an undercut of about three-quarters of an inch so air can reach the fan. In tight or energy-efficient homes, consider continuous low-speed ventilation so humidity peaks are smaller. In hot-humid climates, positive building pressure helps keep outdoor moisture from pushing inward, and a whole-home dehumidifier can keep indoor RH in the 40 to 50 percent range during long muggy seasons.
For laundry rooms, vent the dryer outside, keep lint filters clean, and do not line-dry indoors unless you like feeding wall fungus. Kitchens need range hoods that actually vent to the outdoors, not recirculate steam back into your face. Open windows when weather cooperates. The mission is not zero humidity. It is controlled humidity that does not linger behind a plastic wallpaper mask.
Suspect Mold Behind Vinyl?
Step one is to resist the urge to yank a corner and go to war. That can release a confetti of spores if there is growth. Start with inspection-grade tools. A hygrometer confirms ambient humidity. A thermal camera paints the cold spots. A moisture meter tells you if the substrate is wet. If numbers look suspicious or your nose keeps complaining, call a qualified inspector to open the wall surgically and sample the right areas. We do this all the time. We isolate the room, protect flooring, and make a small test cut at a seam or under a baseboard where it is easy to repair.
Lab testing has a role, but context is everything. Air samples alone may miss a hidden mold colony sealed behind vinyl, because the spores are not freely floating in the room. Targeted surface or cavity air sampling near the affected wall, combined with moisture data and visuals, tells the real story.
If remediation is needed, containment and dust control come first. That means plastic barriers, negative pressure, and HEPA filtration so you are not distributing spores through the house. Personal protective equipment is not a fashion statement. Gloves, eye protection, and a proper respirator are standard. Wallpaper gets removed in sections, bagged while still damp to limit dust, and disposed of promptly. The substrate is then cleaned with a detergent solution and HEPA vacuumed. Porous materials with deep growth, like paper-faced drywall that shows visible fungal staining, usually need to be cut out and replaced. Bleach is not a fix on porous material. After cleaning, the area needs to dry to target moisture levels before you close it up. Finally, fix the moisture source or you will be redoing the same mess next year.
When it is time to put the room back together, pick vapor-open primers and finishes, or use microvented vinyl if you must have that specific look and wipeability. And yes, you can keep the space clean without sealing it in plastic. We even wrote about how moisture sneaks behind finishes in our pet-related mold article here: Prevent Pet-Related Mold.
A Quick Finish Comparison
Here is a fast cheat sheet we use when clients want beauty and easy cleaning without sacrificing drying potential.
| Finish | Drying Potential | Mold Risk If Wet | Best Use |
|---|---|---|---|
| Solid Vinyl Wallcovering | Low MVTR, low permeance | High if moisture gets behind it | Low-moisture interiors with strong ventilation and no exterior vapor drive |
| Microvented/Perforated Vinyl | Higher MVTR than solid vinyl | Moderate with better drying | Where wipeability is essential but you want improved diffusion |
| Non-Vinyl Wallpaper | Moderate to high permeance | Lower risk if humidity is controlled | Exterior walls, bedrooms, living areas |
| Painted Drywall With Vapor-Open Paint | High permeance | Lower if leaks and RH are managed | Most rooms, especially exterior walls |
| Tile On Cement Board In Wet Zones | Relies on waterproofing layer design | Low if assembly is detailed correctly | Showers and direct splash areas, not just steamy walls |
The Hotel Story We Keep Telling
We inspected a boutique hotel that re-papered every bathroom with solid vinyl over an oil-based primer so housekeeping could clean faster. It worked until summer hit. Guests started reporting musty smells and peeling seams. Our thermal camera lit up vertical cold stripes on exterior bathroom walls every morning when the AC ran hardest. Small test cuts revealed damp, paper-faced gypsum with spotty mold growth. The fix was not pretty. We staged containment, removed the vinyl, replaced damaged drywall, and switched to a vapor-open primer with a microvented vinyl that matched their design vibe. Vent timers were added so fans had to run after showers. The smell vanished and the seams stayed put. Housekeeping still cleans fast. Everyone wins, including the walls.
How To Avoid The Vinyl Trap Next Time
Before installing vinyl, map your wall assemblies. Exterior walls in hot-humid climates carry higher risk for inward vapor drive during the cooling season. If you still want vinyl for durability, upgrade to microvented vinyl, choose a compatible vapor-open primer recommended by the wallcovering manufacturer, and use an adhesive designed for humid environments. Make sure the room design supports drying with adequate exhaust and make-up air. If your wall currently has oil-based paint, talk with your installer about bonding primers that are more vapor-open or consider skimming and priming to get out of the double-barrier mess.
If you are renovating a bathroom, ask your contractor where the drying happens in the wall assembly. Showers and direct splash zones should be a different assembly from the rest of the room. Tile and waterproofing belong at the shower, and vapor-open paint with no vinyl belongs on the other walls. The goal is control, not abstinence. Water will happen. Your walls need a way to dry out between episodes.
Can You Spot Hidden Mold Without Demolition?
Yes, and you should try that first. Start with your senses and a humidity meter. Then use non-invasive tools like infrared and pinless moisture meters to target suspicious areas. If those tools suggest a problem, a small, strategic cut at a seam can confirm growth with minimal damage. If you are not comfortable doing that, bring in a pro who can document moisture content, temperature, and humidity gradients along with photos and, if needed, lab samples. You can use our free checklist as your starting point before you call anyone: Mold Clues Checklist.
What If You Already See Bubbles And Smell Musty?
That combination puts you in high-likelihood territory. Avoid fans pointed at the wall for now because you could push spores around. Do not peel the wallpaper randomly. Instead, lower indoor humidity with the HVAC set to dry mode or a dehumidifier, run the bath fan on a timer, and schedule a focused inspection. If the wall is significantly wet, time matters. The longer the vinyl holds moisture in place, the more likely it is you will be replacing substrate rather than just cleaning it.
Let’s Keep Your Walls Breathing
Vinyl has its place, and we are not here to shame your shiny bathroom. We are here to keep it from turning into a biology lab behind the scenes. The entire game is moisture control and drying potential. Vinyl wallcoverings limit both, which is why they need backup from breathable assemblies and proper ventilation. If you are weighing finish options or you think your current vinyl is hiding a secret garden, we can help you sort it out with inspection-grade tools, building science know-how, and a little tough love for your wall finishes.
If you are in a hot-humid region like Texas or along the Gulf Coast, your buildings get extra vapor drive in summer. That is why we see so many hidden mold cases under vinyl in those areas. If your wallpaper is bubbling, your nose is nagging, or your humidity monitor is scolding you, book an inspection with Howard Environmental. We will track the moisture, document what is happening, and lay out a plan to get your walls back to breathing and your air back to boring.