If you swapped your old tank for a heat pump water heater and your basement suddenly feels like a discount walk-in fridge, congratulations, you met physics. HPWHs are energy savers, but they chill nearby air and pipes, which can trigger basement condensation that turns into a mold meet-and-greet. I own a mold inspection and testing company, so I’ve seen the aftermath when a shiny new heater meets a not-so-shiny drainage plan. Here’s how to keep the energy savings and boot the moisture, odors, and mold drama from your basement.
Why Basements Sweat With HPWHs
A heat pump water heater grabs heat from the surrounding air and moves it into your tank. The side effect is cold exhaust air that drops the temperature around the unit. When humid basement air brushes by those chilled surfaces, the dew point shows up, and you get liquid water on pipes, walls, ducts, and the heater’s exterior. That’s basement condensation 101.
The unit itself also produces condensate just like an AC does. Depending on climate and use, expect roughly 1 to 2 gallons per day that must be routed to a proper drain. If that water backs up, overflows a pan, or dribbles across the slab, mold spores do a happy dance and your stored cardboard becomes a felt sculpture. The trick is to control where cold air goes, where water goes, and how humid the space stays.
Smart Placement And Airflow
Start by giving the unit enough air to breathe. Most manufacturers want a minimum room volume around 700 to 1,000 cubic feet. Think a room bigger than a broom closet. If you shoehorn a HPWH into a tight mechanical room, it will chill that small space hard, which can spike condensation nearby. If your chosen nook is undersized, use louvered doors or ducting to bring in and exhaust air per the manufacturer’s manual. The Building America Solution Center lays out those clearance and airflow basics clearly.
Mind the cold-air exhaust. Direct the cool discharge so it does not blast the tank, nearby cold-water piping, or a finished wall. Many models allow a short exhaust duct kit. When you can, aim that cool air toward a larger open area, not an insulation-bare rim joist or the face of your new drywall. If you duct, keep runs short and straight, support the duct so it does not sag, and insulate any duct that could sweat. A backdraft damper helps keep outdoor or crawlspace chill from sneaking back in when the unit is off. Cold ducts that sag and drip are a mold starter kit.
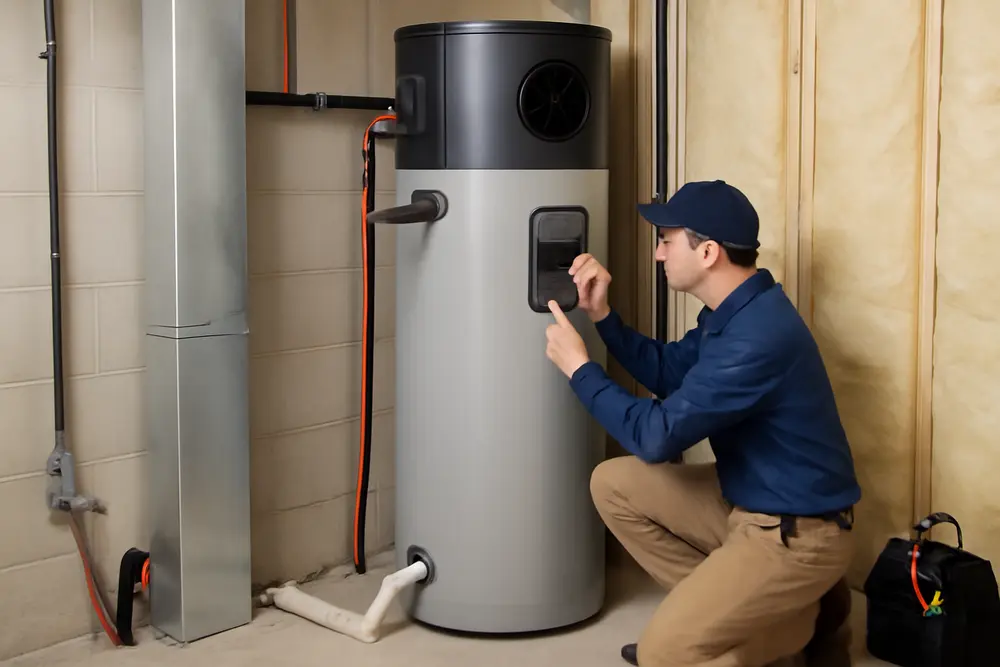
Clearances matter for servicing too. Leave space to clean the air filter and vacuum the evaporator coil. If you make maintenance a pain, it will not happen, and then efficiency drops while moisture problems rise.
Ducting Options That Actually Work
You have three basic strategies for air management:
1) Free-air in a big room. This is the simplest. Park the unit in a basement with enough volume and let it sip room air. Expect a slight cooling effect within 6 to 10 feet of the unit. If your basement already runs cool or clammy, this may not be ideal without extra dehumidification.
2) Duct the intake. Pulling warmer air from upstairs or a warmer zone of the basement can lighten the condensation load. Keep duct runs short, use smooth-walled duct, and seal joints with mastic or UL-181 tape. Insulate if the duct runs through a cool area to avoid duct sweat. Use a backdraft damper if the intake is pulling from outdoors or a vented space.
3) Duct the exhaust. This sends the cold air where it does the least harm. Short, supported, slightly sloped runs help drain any incidental moisture out of the duct, not back toward your heater. Exhausting outside is an option in some setups, but do not starve the unit for makeup air or create negative pressure. Always follow the manufacturer’s duct length and static pressure limits.
Choose the option that balances efficiency, available space, and moisture control. If you notice localized cold zones near the unit, add a small, quiet fan to mix air. A little air stirring can stop that one wall from crying every time the heater runs.
Condensate Drains That Never Back Up
Your HPWH will make clean condensate water. That water must leave the basement on purpose, not by surprise. Here’s how to set that up like a pro:
Gravity is king. If there’s a floor drain or utility sink nearby and below the outlet of the condensate port, run a dedicated line with a continuous downward slope. Pitch matters. Aim for at least 1/8 inch per foot, and 1/4 inch per foot is safer. Support the line every few feet so it never sags and creates an accidental trap. Many installations use 3/4 inch tubing or PVC for reliable flow. Terminate at an approved receptor like a floor drain or sink, with an indirect connection and a trap to keep sewer gases from strolling back into your basement.
No drain nearby? Use a condensate pump. This small pump sits in a reservoir and lifts water to a proper drain. Pick a pump rated for continuous condensate duty and include an overflow safety switch that shuts the heater off if the reservoir fills. Run the pump discharge in rigid tubing where possible, secure it well, and keep the outlet frost-proof if you route outdoors. Pro tip: pumps fail at the worst time. Test the float switch seasonally and clean the reservoir.
Put the unit in a pan. Even if you have a perfect drain, use a corrosion-resistant drain pan under the heater with its own drain line or a second pump. That pan is your last line of defense against clogs and surprise leaks. ENERGY STAR guidance strongly encourages this, and so do my crawlspace crime-scene photos.
Avoid these greatest hits of failure: sharing a condensate line with a sink trap without an air gap, running the line uphill, burying an uninsulated line in a cold wall, and draining to places that freeze. If you live where winter bites, any run that can freeze must be insulated or rerouted. Ice plus backup equals mold and very soggy language.
Stop Pipe Sweat And Surface Chill
Those shiny pipes are not supposed to look like a summer lemonade glass. Insulate your hot and cold water lines near the heater. For hot lines, many codes call for R-3 or better. More helpful than chasing R-values is making the insulation continuous with tight seams and taped joints. For cold lines, use closed-cell foam sleeves and tape the seams so humid air cannot sneak under. Cold-water piping is the usual suspect for condensation, but I also see sweat on the temperature and pressure relief discharge line and mixing valve lines, so do not skip those.
If your model exposes refrigerant lines, insulate them per the manual to stop frost and sweat. Keep the HPWH’s cold-air exhaust from blasting the cold-water inlet or the tank jacket. Some homeowners even add a simple deflector or elbow on the discharge to steer cold air across open space instead of across copper.
What about a tank blanket? Many modern units already have high-quality tank insulation. Slapping on a third-party blanket can trap moisture, block access panels, and void warranties. Check your manual first. If your tank is already insulated well, focus your energy on piping and airflow.
Basement Humidity Targets That Keep Mold Bored
Mold likes humidity above 60 percent. Keep your basement’s relative humidity around 40 to 50 percent in summer. In winter, 30 to 40 percent is common depending on temperature. The magic number is staying under that 60 percent line for long stretches. A heat pump water heater does some incidental drying, but it is not a dedicated dehumidifier. Treat it like a bonus, not your only plan.
Get two or three simple hygrometers and park them in different zones. Put one near the heater, one near storage or drywall finishes, and one at the far end of the basement. Check them weekly at first. If you see afternoon spikes, you might need more airflow, better ducting, or a dehumidifier. If you run a dehumidifier, give it its own drain or pump so you do not babysit a bucket. Match dehumidifier capacity to the basement size and moisture load, then set it to 45 or 50 percent and let it work.
Air mixing helps. A quiet 24/7 fan moving a couple hundred cfm across the basement can keep temperatures and humidity more even, which lowers the risk of hidden damp corners. If your basement is finished, be mindful that cool air from the HPWH can creep behind walls if rim joists and wall assemblies are not air sealed. Keep the cold where it belongs and the humidity where it cannot pool.
Real-World Fixes From Light To Heavy
Here are three snapshots from the mold trenches that show how this plays out.
Light case: Homeowner installs a HPWH in an open basement. Two weeks later, the cold-water pipe drips during long showers and there is a small wet ring on the slab. We add 1/2 inch closed-cell pipe insulation from the floor up to the shutoff valves, tape the seams, rotate the HPWH discharge 45 degrees away from the piping, and drop a hygrometer nearby. Drips stop the same day. Total cost is lunch money.
Medium case: Brand-new HPWH in a semi-finished mechanical room with no floor drain. The installer added a condensate pump, but the discharge line sags twice and runs outside to a north-facing wall. In January, it freezes and backs up, filling the pump reservoir and splashing over the pan. We reroute the discharge to a utility sink with a proper high-loop and check valve, add an overflow shutoff, insulate a short section that passes through a cool chase, and move the unit 12 inches to keep cold exhaust off drywall. We bring humidity from 62 percent to 48 percent with a small dehumidifier set to auto-drain. The carpet dries and stays that way.
Heavy case: Unit jammed in a tiny closet with a louverless door. The closet walls sweat, the subfloor swells, and fuzzy friends colonize the bottom of stored boxes. We bring in a licensed plumber and HVAC tech. The fix includes cutting a proper louvered door, adding exhaust ducting to the main basement, relocating the condensate pump to a serviceable spot with overflow protection, and replacing moldy base trim. We finish with a containment-level HEPA clean of the closet, then add two hygrometers and a 45 percent RH target. No more musty air.
Quick Symptom-To-Fix Guide
| Symptom | Likely Cause | Best Fix | DIY Or Pro |
|---|---|---|---|
| Pipe sweat near heater | Cold-air exhaust on pipes, no insulation | Insulate cold and hot lines, redirect exhaust | DIY-friendly |
| Puddle under unit | Clogged line or failed pump | Clear line, add slope, test or replace pump, overflow shutoff | DIY to start, pro if pump or wiring needed |
| Drips on ducts or drywall | Cold exhaust hitting surfaces, poor mixing | Duct exhaust, insulate duct, add mixing fan | DIY or HVAC |
| Musty odor and visible spots | High RH over time, hidden condensation | Find moisture source, lower RH to 40-50 percent, assess mold | Call a mold pro |
Code And Best Practice Nuggets
Follow your manufacturer’s installation manual and local code. Most require a dedicated condensate drain to an approved receptor, or a rated pump when a gravity drain is not feasible. Indirect connections and traps are the standard approach to block sewer gases. Drain pans are strongly recommended, and often required, especially above finished areas. Hot-water piping should be insulated to at least local code minimums, often R-3 or better, and cold lines deserve the same level of attention even if your code is silent on them.
Support condensate lines so they do not belly and create standing water. Keep discharge lines where they cannot freeze. Leave service clearances for air filters, coil cleaning, and anode access. If you are ducting the unit, stick to the maker’s max length and static pressure chart like it is a treasure map.
Maintenance That Actually Prevents Mold
Monthly: Look at the drain pan. If it is wet and your line is dry, find out why. Check the condensate line for kinks or algae slime. If you have a pump, lift the float to confirm it runs and discharges cleanly. Wipe any visible dust from the top screen and louvers.
Quarterly: Clean or replace the HPWH air filter. Vacuum the evaporator coil face gently. Inspect pipe insulation for gaps and re-tape seams. Confirm the drain line slope has not changed due to a bumped support. If a dehumidifier runs, rinse its filter and verify its drain.
Twice a year: Flush the condensate line with warm water and a splash of white vinegar to discourage slime. Inspect ducting for loose straps or sweaty sections and re-seal joints. Re-check RH with your hygrometers during a humid week. If readings creep above 55 percent, adjust dehumidifier setpoints or airflow.
Annually: Test any leak or overflow shutoffs. If your unit has an anode rod access and your water is aggressive, talk to a plumber about inspection intervals. Review ducting and airflow if you finished new areas or stored big items near the heater. If you live where winters are brutal, do a pre-freeze check to ensure no discharge lines will ice up.
When Should You Call A Pro?
Contact a licensed plumber or HVAC installer if you need new drains, pumps, electrical circuits, or ducting runs beyond the manufacturer’s basic kit. Call a mold inspector if you see visible growth bigger than a dinner plate, smell persistent mustiness, or if RH readings stay above 60 percent for weeks. My team tests, maps moisture, and tells you whether you need simple fixes or a remediation plan. You do not need a biohazard suit for a sweating pipe, but you also do not want to ignore a slow-mo leak in a finished wall. If you are within our service area, we will bring the test kits, thermal cameras, and beautifully judgmental clipboards.
FAQ: Your Spicy Basement Questions Answered
Does a heat pump water heater replace a dehumidifier?
Not really. It can remove some moisture as a side effect, but count that as a bonus. If your basement runs humid, plan for a real dehumidifier to hold 40 to 50 percent RH steadily.
How much condensate should I expect per day?
Roughly 1 to 2 gallons in typical indoor humid climates, sometimes more with heavy hot-water use. That is why proper drainage and pan protection matter.
Can I run the condensate outside?
Only if the line is protected from freezing and routed to an approved location. In cold climates, an outdoor discharge likes to become an icicle that sends water backward. Indoors to a floor drain or sink is safer.
My basement got colder after the install. Is that normal?
Yes. The unit is moving heat from the room into your water. If the chill bothers you, duct the exhaust, add some air mixing, or relocate intake air from a warmer interior zone if the model allows it.
Will a tank insulation blanket help?
Generally no for modern units. You can trap moisture, block access, and void warranties. Focus on pipe insulation and airflow management instead.
What relative humidity grows mold?
Sustained RH above 60 percent is team mold’s comfort zone. Hold 40 to 50 percent in summer, and you will make mold very bored.
Is ducting the exhaust outside a good idea?
Sometimes, but do not starve the unit for makeup air or exceed duct length limits. Keep ducts sealed, insulated where needed, and supported so they do not pool water. Follow the manufacturer’s guidance.
Should I use hybrid or heat-pump-only mode?
Hybrid is a good daily driver for most homes, balancing recovery speed and efficiency. Heat-pump-only runs cooler and longer, which can increase local cooling. If condensation spikes with heat-pump-only, hybrid can help moderate that.
Sources Worth Your Time
Here are trustworthy resources that keep your basement dry and your energy bill skinny:
ENERGY STAR Heat Pump Water Heater Guide for installation best practices, drain pans, and condensate routing.
Building America Solution Center HPWH Checklist for airflow, spacing, and ducting pointers.
HPWH Condensate Drainage Guidelines for practical drainage diagrams and tips.
Finished Basement Humidity And Dehumidifier Sizing for RH targets and dehumidifier selection.