Hidden mold loves a good hideout. Under laminate and vinyl plank is prime real estate when moisture sneaks in from a concrete slab, a plumbing leak, that spilled dog bowl you forgot over the weekend, or the wrong underlayment that traps humidity. If you want great looking floors and clean indoor air, you need a moisture game plan. This guide shows you how to test the slab, pick the right vapor barrier and underlayment, acclimate properly, leave real expansion gaps, and keep conditions steady so you never smell that musty funk again.
Why mold is common under LVP and laminate
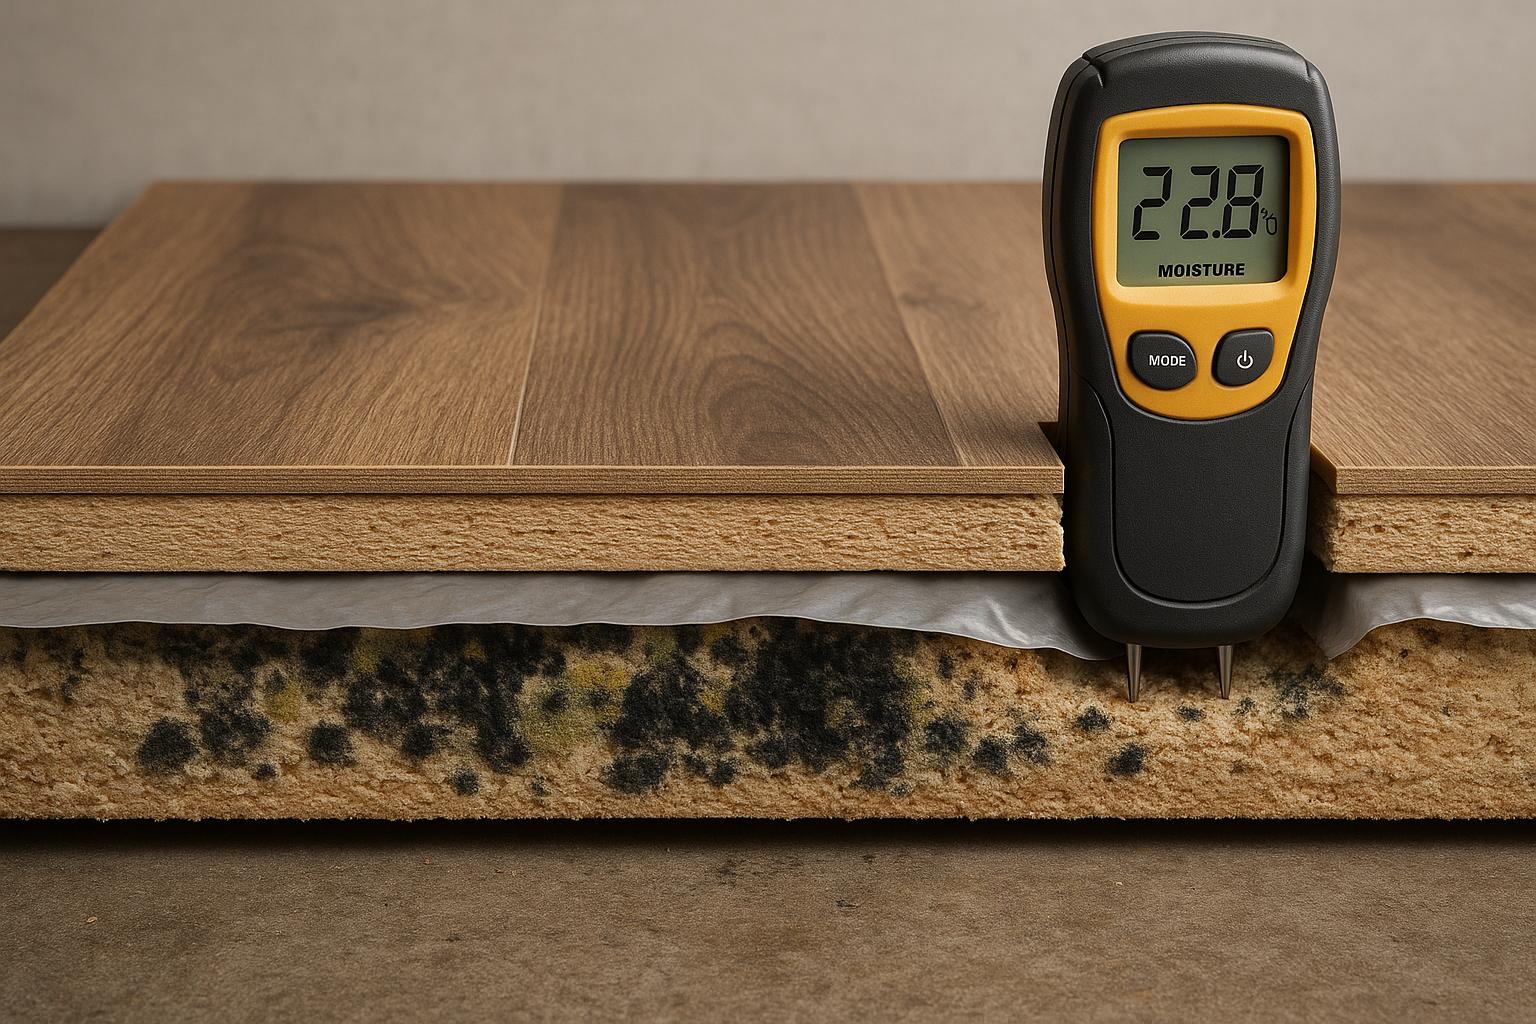
Mold under laminate flooring and mold under vinyl plank flooring both come down to one thing. Moisture that cannot escape. Floating floors are great at forgiving slightly uneven subfloors and they click together like a dream. They are also great at trapping humidity if you install over a damp slab, skip the vapor retarder, or stretch runs too long with no expansion space. Liquid water from spills and wet mopping can also migrate into seams, soak the underlayment, and set up a humid microclimate beneath the planks. That subfloor to underlayment to plank sandwich turns into a spa day for mold.
Concrete slabs are always releasing some amount of moisture vapor. Basements and on grade installs have even more risk. If the floor assembly cannot breathe or if the surface above blocks normal movement, you get warped boards, lifted edges, and the telltale musty odor. Mold growth is predictable when moisture intrudes and stays put. If you want to cut off the problem at the source, control the moisture path. We break down the exact steps below. For a deeper look at hidden mold triggers, see our guide on the causes of hidden mold.
Still wondering where it hides out most? Under tight baseboards with zero expansion space, over slabs with no vapor retarder, around kitchens and baths with frequent splashes, and anywhere HVAC is shut off during install or during a muggy week. We also see it under floors laid over wet leveling compounds and over new concrete that did not dry enough. You can cut these risks dramatically with the steps in this article.
Signs of hidden mold under floors
Your nose usually gets there first. A persistent musty odor that is stronger near baseboards, transitions, or certain rooms is a classic sign. In many homes, a musty smell that gets worse after rain or after a humid day points toward subfloor moisture. If you have a history of leaks, a sump that failed, or standing water, treat that as a red flag. Our guide on what to do if you smell mold but can’t see it covers targeted checks and next steps.
Visual clues help too. Look for plank edges that curl or crown, soft spots near sinks or dishwashers, white powdery deposits at concrete joints, or dark lines along plank seams. A floor that clicks when you step or feels spongy can signal wet underlayment. Pet accidents and plant watering mishaps are frequent culprits.
Basic homeowner tests can narrow it down. A quality pin or pinless moisture meter can check the subfloor at edges or under a removed threshold. An infrared camera can spot cold anomalies that line up with evaporating moisture. A hygrometer can confirm indoor relative humidity. If you suspect a problem but do not want to start ripping planks, book a professional inspection that includes moisture mapping and targeted sampling. Schedule an inspection and we will sort the facts from the funk.
Pre install moisture testing
If you want to avoid mold under vinyl plank flooring or laminate, test the slab before you ever open a box. There are two primary tests most manufacturers reference. In situ relative humidity per ASTM F2170 and calcium chloride for moisture vapor emission rate per ASTM F1869. Many brands accept either one, and some require both. F2170 measures internal slab relative humidity which tends to be more representative of long term conditions, while F1869 measures surface emission. Always follow the product install guide and record your results. You want photos and written readings for any warranty and for peace of mind. The ASTM standard for F1869 lives here if you want the technical detail ASTM F1869.
Typical limits vary by brand and by adhesive. You will see allowable F2170 internal slab RH anywhere from 75 percent to 90 percent. You will also see F1869 MVER limits around 3 to 5 pounds per one thousand square feet per 24 hours. These are common values, not rules for your specific product. Check your brand’s documentation. If readings are too high, you either need an approved moisture mitigation system, a proper vapor retarder, or an adhesive rated for higher RH. Flooring Clarity has a good summary of testing and thresholds you can reference acceptable moisture content for vinyl flooring.
How to run the tests in plain language. Stabilize the indoor conditions by running HVAC for a couple days. Place RH probes per the F2170 method at the correct depth for slab thickness and allow them to equilibrate. For calcium chloride, prep the surface, place the test dish, seal it to the slab, wait the required time, then weigh it and calculate the emission rate. Keep a simple log with location, time, and reading for each station. Label photos. It is not glamorous, but it is way cheaper than tearing out a smelly floor in six months.
Install tactics that stop mold
A great install is not just straight lines and pretty transitions. It is a moisture control system that keeps your floor and your air clean. Here are the core moves that make a difference and the little installer notes that often get skipped.
Moisture barrier and underlayment
Over concrete or any damp subfloor, a true vapor retarder is your friend. Most floating laminate and many click together vinyl plank systems call for a 6 mil polyethylene sheet as a continuous layer. Overlap seams, tape them tight, and bring the film up the wall behind baseboards. Some underlayments include a built in vapor retarder. Use only the type your manufacturer approves. Do not stack multiple cushion layers since that can stress the click joints and trap more humidity. This product spec page shows the type of vapor retarder many LVP systems expect vapor barrier under vinyl plank.
Over wood subfloors, the goal is different. You want a smooth surface and noise control without blocking normal seasonal movement of the wood below. Follow your brand guidance. In basements and on slab, always pick a solution that slows vapor migration into the assembly. Never float a floor over a surface that is actively wet. If moisture is that high, you need mitigation before any pretty new plank goes down.
Acclimation and stable conditions
Acclimation sounds boring until you skip it and your floor turns into a potato chip. Many LVP and laminate manufacturers require the material to sit in the conditioned space for 48 to 72 hours or more. Some rigid vinyl products brag about no acclimation. We see fewer problems when you give them at least a day or two in the real conditions they will live in. Keep HVAC running before, during, and after install. No shutting off the air in the middle of a muggy week. Flooring Clarity has a useful overview of acclimation expectations does vinyl plank need to acclimate.
Expansion gaps and movement
Floating floors move. That is the whole point. If you box them in tight against walls, cabinets, or around door casings, they push back. Pushback leads to buckling and seam stress, which lets moisture creep and hold. Leave a perimeter gap around the entire room as your product requires, commonly around one quarter inch, sometimes more for long runs or humid zones. Use transitions to break up large areas. Do not caulk the expansion gap with a rigid bead. That defeats the purpose. A primer on why gaps matter is here vinyl plank expansion gap.
Subfloor prep and flatness
Flatness is comfort and longevity. Peaks telegraph and create point loads on click joints. Valleys can hold moisture. Use manufacturer approved patch or leveling products and let them dry completely. A moisture retarder does not fix a leveling compound that is still off gassing water. If in doubt, test those areas again before covering them. Clean the slab or subfloor so debris does not create micro standoffs that compromise the vapor retarder tape seals.
Adhesives and below grade notes
For glue down LVP, choose an adhesive designed for the slab RH you actually have, not the RH you wish you had. There are adhesives rated for higher RH zones. In basements or on slab at grade, factor in seasonal swings. High summer indoor humidity can spike moisture at the slab surface even if the rest of the year looks okay. Plan for the worst week in your climate, not the best day in the showroom.
Rooms with water and radiant heat
Kitchens, baths, laundry rooms, and entryways deserve extra care. Seal penetrations, use proper transitions and trims, and teach the household to wipe spills now, not later. For radiant heat, follow temperature ramp up guidelines and never shock the floor. Rapid swings can open seams and invite moisture migration.
Maintenance after install
Your new floor should never feel like babysitting. A few smart habits keep it looking great and stop mold under laminate flooring or vinyl planks from getting a foothold.
Keep indoor relative humidity in a comfortable range. Thirty to fifty percent is a good target and staying under sixty percent cuts mold risk. Use a dehumidifier in basements and during muggy seasons. Our primer on hidden mold triggers explains why indoor RH control matters so much.
Clean up spills and pet accidents quickly. Skip soak and saturate cleaning. Use a barely damp microfiber approach and a product your manufacturer allows. Steam mops can drive moisture into seams. Mats at doors catch drips and grit that grind into finish. Do a quick perimeter check after storms, especially near exterior doors and foundation walls.
Show your HVAC some love. A clogged condensate drain, leaky supply boot in a crawlspace, or duct sweating can add moisture you do not see until the smell shows up. Run bath fans long enough after showers. In laundry rooms, confirm the dryer vent is tight and not dumping warm moist air into the room.
For basements, manage exterior water too. Clean gutters, confirm downspouts kick water far away, and correct soil grade that slopes toward the foundation. Inside, test the sump pump and consider a backup. Control water outside and you will fight less moisture inside.
When to call a pro
If your floor smells musty, readings are high, or you want a pre install check with documentation, it is time to bring in a third party. We provide visual inspection, thermal imaging, moisture meter mapping, and targeted air and surface sampling. If we find a problem, we can write a practical remediation plan and then verify the fix with a mold clearance test. Want a sense of price before you call? See our breakdown of mold testing costs.
Thinking about ripping it all up and tackling the mess alone? Sometimes that is fine for small areas and light surface growth if the leak is fixed and you have proper containment and PPE. For larger areas, persistent odors, or when occupants are sensitive, read our guide on professional vs DIY mold removal then decide what fits your situation. If you want us to handle the inspection, testing, or post remediation check, you can book an inspection today.
Quick checklist
Print this and hand it to your installer or keep it on your phone. It is the short version of everything above.
- Run HVAC for two to three days before install so temperature and humidity are stable.
- Test the slab with F2170 in situ RH and or F1869 calcium chloride as your product requires. Log results and take photos. Reference the standard at ASTM F1869.
- If readings exceed your product limits, pick a moisture mitigation system or an adhesive rated for higher RH. See typical ranges at Flooring Clarity.
- Use the correct vapor retarder or underlayment. A 6 mil poly sheet is common over concrete. Follow your brand guidance and do not double stack cushions. See an example spec at Flooring Supply.
- Acclimate the product in the space for 48 to 72 hours unless your manufacturer specifies a different time. Keep HVAC running.
- Leave the right expansion gap around the perimeter and at immovable objects. Use transitions to break long runs.
- After install, keep indoor RH between thirty and fifty percent and under sixty percent as a ceiling. Wipe spills fast and avoid wet mopping.
FAQs
Can mold grow under vinyl plank or laminate?
Yes. If moisture gets trapped under the floor from a damp slab, spills, or the wrong underlayment, mold can grow out of sight and cause odors and health complaints. The fix is simple in concept. Control moisture before and after install and verify with appropriate testing.
How do I test moisture before installing LVP or laminate?
Use in situ RH probes per ASTM F2170 and or calcium chloride tests per ASTM F1869 as your product requires. Record readings and compare to your product limits. If you are outside the limits, use mitigation or a moisture rated adhesive. Details on the F1869 method are at ASTM F1869.
What RH or MVER numbers are acceptable?
That depends on your brand and adhesive. Many products allow internal slab RH between 75 and 90 percent and MVER around 3 to 5 pounds per one thousand square feet per 24 hours. Do not assume. Read your install guide. A plain language overview is here moisture content for vinyl flooring.
Do I need a vapor barrier under laminate or vinyl plank?
If you are over concrete or any damp subfloor, yes in many cases. A 6 mil polyethylene sheet or an approved underlayment with a vapor retarder slows vapor migration into the assembly. Always match the product to your flooring brand. See a typical spec example vapor barrier under LVP.
How long should flooring acclimate?
Many brands want 48 to 72 hours in the conditioned space. Some ask for longer. If your area sees big swings, giving it extra time rarely hurts. A good overview is here vinyl plank acclimation.
What indoor humidity should I maintain?
Aim for thirty to fifty percent most of the time and stay under sixty percent to reduce mold risk. Dehumidifiers help in basements and humid seasons. We explain why RH control matters in our article on hidden mold triggers.
What are the best clues that I already have hidden mold under a floor?
A musty odor that persists, lifted or curled edges, soft spots near water sources, and a history of leaks. If you smell mold and cannot see it, our quick guide on hidden mold odor can help you decide whether to open a section, test, or call for an inspection.
My slab tests are high. Can I install anyway?
Not without real risk. If RH or MVER exceed the product limits, you need a rated moisture mitigation system or a flooring adhesive that tolerates those readings. Skipping this step voids warranties and sets you up for buckling, odors, and growth. See this summary of limits and mitigation choices moisture limits and mitigation.
When should I call Howard Environmental?
Call if you want pre install slab testing and documentation, if you smell mold but cannot find it, if you need a moisture and air quality check, or if you want post remediation clearance. We handle inspection, moisture mapping, air and surface sampling, and post remediation clearance testing. For costs and packages, see inspection and testing services.
A quick word from the crew that cleans this stuff
We have peeled back a lot of pretty floors that turned into science projects. In most cases, the fix would have cost a fraction of the tear out. Do the slab tests first. Use the vapor barrier your product calls for. Give the planks time to acclimate. Leave real expansion space. Keep indoor humidity in check. None of this is glamorous. All of it saves you money and keeps your air clean.
If you want backup for a tricky install, a musty smell that refuses to quit, or confirmation that a remediation job is truly done, we are happy to help. Contact Howard Environmental to set up inspection and testing. We bring the meters, the probes, and the straight talk. You keep the good looking floor and your sanity.