If your ductless head smells like a locker-room smoothie and your airflow sounds like it’s pushing through a wet sponge, you’re not imagining things. That’s mini-split biofilm taking up residence on your coil, blower wheel, and drain pan like it pays rent. I own a mold inspection and testing company, and I see this party trick all the time. The fix is simple when you catch it early, and still very doable when you haven’t. Here’s the quick, slightly spicy, zero-fluff guide to mini-split biofilm control using cleaning, condensate care, humidity settings, and a maintenance plan that actually works.
Why Mini-Splits Grow Biofilm
Mini-splits are fantastic at quietly cooling and heating. They’re also fantastic at quietly breeding slime when neglected. Biofilm is a sticky community of mold, bacteria, and assorted funk that glues itself to damp surfaces. In a ductless indoor unit, the recipe is simple: moisture from coil condensation, dust and dander as food, and time. When your blower wheel is dirty, airflow drops, surfaces stay wet longer, and the mold spore fan club explodes. If your condensate line is partially clogged, the drain pan holds water like a birdbath. Add high indoor humidity and modes that don’t dry the internals, and you’ve got the perfect biofilm Airbnb.
Here’s the kicker: the cleaner the blower wheel and coil, the faster the system dries itself after each cycle. Faster drying means less time in the mold-friendly zone. That’s why ductless air handler maintenance lives or dies on three habits: get the blower wheel and coil truly clean, keep the condensate line moving, and control humidity so you’re not marinating the unit between cycles.
How To Clean The Gunk
You can absolutely remove mini-split biofilm without turning your living room into a car wash. The trick is setting up correctly and using the right cleaners and rinse technique. If your unit looks like a compost bin, consider calling a pro. If you’re reasonably handy, read on.
Power, Protection, And Setup
Kill power at the disconnect or breaker. Don’t trust the handheld remote alone. Put on gloves and eye protection, and cover nearby walls or furniture. Remove the front cover and washable filters, then expose the coil and blower wheel. Use a mini-split cleaning bib kit or a well-fitted plastic catch to funnel rinse water into a bucket. Gently cover control boards and electronics with plastic. This is a wet job, just not a soak-the-motherboard job.
Coil Cleaning That Actually Works
Use a coil-cleaner that’s labeled for evaporator coils and safe for indoor use. Food-grade safe or EPA-registered cleaners are ideal. Avoid harsh acids or anything that says it does not require rinsing but leaves residue. Spray the coil evenly and let it dwell for 5 to 10 minutes so it can break down the biofilm and nicotine-like goo that glues dust to fins. Rinse with a gentle, controlled spray working from top to bottom. Do not blast the fins. Bent fins reduce airflow and invite more slime later.
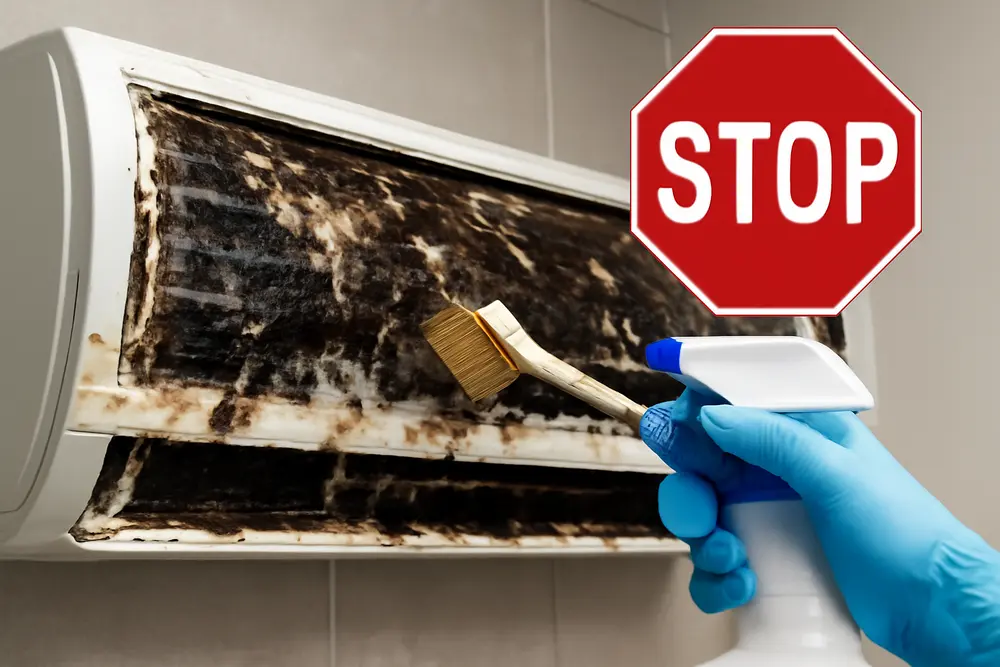
The Blower Wheel Is The Biofilm Magnet
Peek at the blower wheel through the louver opening. If you see dark, furry vanes or a shiny black glaze, that’s biofilm on the wheel. Light buildup can be cleaned in place: rotate the wheel by hand, spray cleaner carefully, let dwell, and rinse slowly while rotating. Use soft brushes or foam swabs to coax gunk off each vane. Heavy buildup usually needs removal: disconnect the wheel per the service manual, take it outside, and rinse thoroughly with a garden hose. Keep the jet moderate, not pressure washer-aggressive. Dry the wheel fully before reinstalling so you don’t fling water into the motor and electronics.
Rinse Strategy And Dry-Down
Rinse until runoff is clear. If you stop while it’s still tea-colored, you’re just seasoning your coil. Once clean, run a box fan in the room facing the open unit for 20 to 30 minutes. When reassembled, run the system on fan-only or dry mode to finish drying the coil and wheel. That first run may release a little funk. If the odor persists beyond a day, there’s still residue hiding in the wheel, on the coil edges, or in the drain pan channels.
What Not To Do
Skip bleach or anything that can corrode aluminum or damage plastics. Do not steam clean electronics. Do not use high-pressure nozzles inside the cabinet. If you’re forcing water backwards through the drain, know where it’s going. A flooded wall cavity is not a win.
Condensate Line Care
The condensate line is your unit’s escape route for water. When it slimes up, the drain pan becomes a petri dish and your mini-split biofilm problem goes pro. Every service should include a drain inspection. Look for slow dripping, standing water in the pan, or water marks under the head. If there’s a pump, test it so you’re not learning about a failure at 3 a.m. after a cool cycle.
For cleaning, a simple method works well. Flush the line with a mild solution like white vinegar and water. If you have an outside discharge, hook up a wet-dry vac to the outlet and pull the gunk toward the exterior. Keep the vac running for a solid minute to clear biofilm strings. Inspect the drain pan channels and clear any debris with a soft brush or bottle brush. If your installation allows, add a cleanout tee during the next pro visit to make future maintenance easier. For lines with chronic growth, more frequent flushes help. Skip random chemical tablets unless the manufacturer allows them for mini-splits. Some tablets are designed for large metal pans, not compact polymer pans and pumps.
Check slope on gravity drains. The line should run downhill without bellies. Bellies hold water, and water holds biofilm. If you see kinks or uphill loops, that’s an installation issue that encourages mold and backups.
Smarter Humidity Settings
Biofilm loves sticky rooms. Keep indoor relative humidity between about 40 and 60 percent. If your home lives at 65 percent and above in summer, even a spotless coil will stay wet too long after cycling off. Use a hygrometer to see what’s going on room by room. Mini-split dry mode can be your friend, especially after heavy cooling. In dry mode, the unit typically runs a colder coil with a lower fan speed to wring moisture out of the air, then may keep the blower running to help evaporate remaining moisture from the coil surface.
Some tips that punch above their weight:
Use dry mode at the end of the day. After your last cool-down, run dry mode for 20 to 40 minutes so the coil and blower wheel do not tuck in soaking wet.
Mind your setpoints. Overcooling to 67 just to feel crisp can push the coil very cold and generate a lot of condensate. Combine that with a dirty blower and you’re basically fogging the inside of the head all evening.
Avoid constant fan-only in humid weather. Running fan-only for hours can re-evaporate water from the pan back into the room and keep the inside of the unit damp. A short fan-dry cycle after cooling is helpful. Hours of fan-only at 65 percent RH is not.
Add a standalone dehumidifier if needed. If your space is oversized for the mini-split or has chronic humidity from cooking, showers, or a crawlspace, offloading pints with a dehumidifier makes the mini-split’s interior much less mold-friendly.
Seasonal Maintenance
Think in seasons and usage. If you run your ductless 8 to 12 months a year, you need more frequent service than the weekend cabin with a single head. As a rule, deep clean at least once a year. Homes with pets, dusty renovations, smokers, or coastal salt get better results with two deep cleans per year. Between those, filters deserve your love. Rinse or vacuum washable filters every 2 to 4 weeks under normal use. Allergies, pets, or wildfire season means weekly checks. Dirty filters choke airflow, keep the coil cold longer, and leave the blower wheel wet and happy for mold growth.
Spring is your pre-game: clean filters, inspect coil and blower, flush the drain, and confirm humidity control is available. Fall is your cooldown lap: another check on the blower wheel and pan after summer’s marathon of moisture, and one more drain flush so the unit does not winter-over with swamp water in the line. If you heat with the mini-split in winter, you still need clean filters and a clean blower. Heat mode generally runs the coil warm, so you’ll see less condensate, but dust still accumulates and can turn into paste when you start cooling again next spring.
Signs You Need Service
You don’t need a lab to know when ductless air handler maintenance is overdue. If you smell a musty or sweet-sour odor when the unit fires up, biofilm is already in the chat. If you can see a gray or black film on the blower wheel vanes through the louvers, it is well past due. Reduced airflow, uneven cooling, water drips from the indoor head, or an overflowed condensate pan are all red flags. If you’ve cleaned filters but airflow is still weak, the wheel is probably caked. Any visible mold on the coil face or plastic shrouds means stop procrastinating. Biofilm does not get bored and leave.
DIY Or Call A Pro?
Some of this is straightforward. Some of it is a Saturday project you’ll regret. If you’re doing light care, keep it DIY: rinse filters, wipe louvers, run dry mode, and keep an eye on the drain. Twice a year, flush the drain and visually inspect the coil for buildup. When the blower wheel needs removal, the coil needs a deep flush, or you have a condensate pump that chirps like a smoke alarm at 2 a.m., call someone who does this every day. If there’s any hint of refrigerant or electrical issues, do not freelance it. Also check your warranty rules. Many require documented service by qualified techs.
| DIY Scope | Good Tasks | Hire A Pro When |
|---|---|---|
| Light care | Clean filters, wipe cabinet and louvers, run dry mode, inspect drain outlet | Odor persists after light cleaning, or you see mold on the blower or coil |
| Seasonal check | Flush condensate line, check pan for standing water, basic coil inspection | Drain is repeatedly clogging, pump alarms, or water damage is present |
| Deep clean | Only if you’re comfortable removing the blower wheel and using a bib kit correctly | Unit is under warranty, heavy buildup is present, or you’re unsure about disassembly |
What does a proper professional deep clean look like? The tech will protect the wall and electronics, remove the blower wheel if needed, use an appropriate coil cleaner with the right dwell time, rinse until runoff is clear, clear the drain pan channels, vacuum or flush the condensate line from outside to inside, check the float switch and pump, and reassemble with a full operational test of cooling and dehumidifying performance. Many pros will also straighten mashed fins and measure temperature split to confirm you are back in the efficiency zone.
Mini-Split Biofilm Fix: A Simple Routine
Here’s the simple routine that beats biofilm every time. Keep filters clean so airflow stays strong. Keep the coil and blower wheel actually clean, not kind-of-shiny-through-the-grille clean. Keep the condensate line moving so water leaves and slime starves. Keep indoor humidity in the 40 to 60 percent pocket and use dry mode strategically so the unit dries itself after cooling. Put two dates on your calendar for real ductless air handler maintenance each year. If you inherit a unit with a bad head start, get a professional deep clean to reset it, then keep it that way with the routine above.
Step-By-Step: Quick Clean In Place
If you need a condensed field guide, here’s a no-nonsense path that works for most heads with light to moderate buildup.
Step 1: Kill power. Breaker or disconnect. Wait a minute for capacitors to relax.
Step 2: Open the unit. Pop off the front cover, remove filters, and expose the coil and blower wheel. Lay a bib kit or catch beneath the head.
Step 3: Protect electronics. Lightly wrap boards and wires with plastic so gentle rinse water cannot sneak in.
Step 4: Clean the coil. Spray an indoor-rated evaporator cleaner. Let it dwell 5 to 10 minutes. Rinse gently from top to bottom until clear.
Step 5: Clean the blower wheel. Rotate by hand, spray cleaner on the vanes, let dwell, then rinse while rotating. Use soft brushes for stubborn film.
Step 6: Clear the drain. Pull biofilm strands from the pan channel. Flush the line with a vinegar-water mix or use a wet-dry vac on the outlet.
Step 7: Dry and test. Air dry with a box fan, then reassemble and run fan-only or dry mode for 20 to 30 minutes. Check for odd noises, leaks, and normal airflow.
Pro Tips That Save Time
Label fasteners and covers as they come off. A muffin tin or magnetic tray keeps screws from running off to start a new life behind the couch. Keep a small fin comb handy for bent coil fins. Replace cracked or loose drain line insulation so you do not create external condensation drips. If your blower wheel is always filthy at the same pace, increase filter cleaning frequency and verify your room has enough return air clearance around the head. A head buried behind a bookcase is begging for mold.
FAQ
What is mini-split biofilm?
It’s a sticky layer of microorganisms like mold and bacteria that glues itself to damp surfaces inside your ductless head. It smells musty, looks gray to black, and feeds on dust and dander. Once established, it slows airflow and keeps surfaces wetter longer, which grows even more biofilm.
How often should I clean the blower wheel and coil?
At least once per year for normal homes. Twice per year if you have pets, high summer humidity, smokers, or dusty conditions. Filters need attention every 2 to 4 weeks, more often during heavy use.
Can I use bleach to clean my mini-split?
No. Bleach can corrode aluminum fins and damage plastics, and it is not a good coil cleaner. Use indoor-safe evaporator coil cleaners and rinse thoroughly. Vinegar is fine for the drain line, not for soaking the coil.
Why does my mini-split smell when it first turns on?
You’re smelling biofilm and wet dust getting a joyride into your room. The odor is strongest when the blower wheel and pan have buildup. Clean the blower wheel, coil, and drain pan channels, then run a fan-dry or dry mode cycle after cooling.
Should I run the fan after cooling to dry the unit?
Yes, but briefly. A short fan-dry or dry mode cycle after cooling helps. Running fan-only for hours in a humid room can re-evaporate pan water and keep the head damp. Use dry mode or a short fan run, not an overnight fan marathon.
What indoor humidity should I aim for?
Target 40 to 60 percent relative humidity. Above 60 percent, water lingers on the coil and blower wheel and biofilm throws a party. If your system cannot hold that range, add standalone dehumidification or fix moisture sources like leaky crawlspaces and showers without exhaust.
Do aftermarket filters help or hurt?
Some high-MERV or thick aftermarket filters can choke airflow on mini-splits that were designed for low-resistance washable screens. If you upgrade filtration, verify airflow and keep the blower wheel spotless. Choked airflow equals wet internals and more biofilm.
Ductless Air Handler Maintenance That Sticks
You can stop mini-split biofilm with three habits that cost less than your coffee addiction: keep filters clean, keep water moving out, and let the machine finish drying itself. Add a real deep clean once or twice a year, pick smart humidity targets, and your ductless head will stop smelling like a locker room and start acting like the efficient, quiet machine you paid for. If you hit a wall with heavy buildup or mysterious leaks, call a pro who knows these systems inside and out. You handle the calendar reminders. We’ll handle the slime.