If mold had a dating profile, it would say: “Looking for warm, humid spaces with soft textiles, porous woods, and long-term commitments.” Storage units check every box if you set-and-forget your stuff. The fix is simple and not weirdly expensive: use climate-controlled storage, prep your belongings so you’re not trapping water with them, elevate to dodge floor moisture, deploy silica gel packs where they actually help, and set a check-in schedule so mold freeloaders don’t move in. I test and investigate mold professionally, and I can tell you the storage stories that go wrong always share the same villains: humidity above roughly 55 percent, damp items that were rushed into bins, and zero monitoring. You don’t need to turn your unit into a lab. You just need a plan.
Why Climate-Controlled Storage Wins
Start with the one choice that instantly lowers your risk: climate-controlled storage. That means the facility uses HVAC to hold temperature and relative humidity within a steady range instead of letting your unit turn into a summer sauna or winter fridge. Mold typically blooms when relative humidity cruises above about 50 to 60 percent. At Howard Environmental we recommend keeping indoor RH in the 30 to 50 percent zone to make mold miserable and keep condensation at bay. That range shows up again and again in our guidance for homes and micro-storage setups like instrument cases because it works. See our humidity target advice here: Ideal Indoor Humidity Levels.
When you’re choosing a unit, look for a facility that can explain how they manage humidity, not just temperature. Ask for their target range and whether interior units are insulated. Look for solid door seals, dry concrete, and absence of water stains on walls and ceilings. Take a cheap hygrometer along on your tour. If you see RH hanging around 60 percent or higher, keep shopping. In a perfect world you want RH between 30 and 50 percent, with temperature steady so you don’t get condensation on cold surfaces.
What Actually Causes Mold in Units
Storage mold isn’t mysterious. It’s basic biology plus physics. Mold spores are everywhere, waiting for four things: moisture, a food source, stagnant air, and time. Storage units generously provide food sources: paper, cardboard, cotton, leather, and unfinished wood. Give those materials moisture and low airflow, then wait a few weeks, and you’ve built a starter terrarium. Condensation on concrete floors, damp mattresses wrapped in plastic, boxes packed tight against chilled exterior walls, and leaky roofs all feed the beast. We cover typical triggers here: Causes Of Mold. The punchline is this: control moisture and airflow, and you control mold.
Prep Work Before You Pack
If you only change one habit, let it be this one: never store anything that isn’t clean and fully dry. Even a small amount of moisture sealed in a tote will keep RH high enough inside that container for mold to start within a couple of days.
For furniture, dust and wipe hard surfaces with a mild detergent solution, then let everything dry thoroughly. If you’ve cleaned upholstery or rugs, wait until they’re truly dry to the core, not just dry to the touch. Cracking a window or running a fan for a few hours is cheap insurance before packing day. For wooden furniture, let it air out for 24 hours after cleaning so moisture equalizes. Leather needs to be clean and dry, then treated with a leather conditioner recommended by the manufacturer. Avoid oil-heavy treatments right before storage because they can trap dust and feed mildew.
Clothing and textiles should be freshly laundered and completely dried. Skip fabric softener sheets inside bins; their fragrance can attract dust and they don’t help with moisture. For valuable textiles and keepsakes, use acid-free tissue paper and boxes made for archiving. And if you’re tempted to vacuum-seal everything: only do that if the items are bone-dry and staying in a stable, cool space. Trapped humidity plus temperature swings can create a very unpleasant unboxing.
Pack Smart for Airflow
Airflow is boring until your couch smells like a gym bag. Give your items room to breathe. Use cotton sheets or breathable furniture covers instead of plastic wrap for large items. Plastic can trap condensation against surfaces, especially in units that warm up and cool down daily.
Keep at least a couple inches of space between stored items and the walls, especially exterior walls. Don’t build a solid wall of boxes where air can’t move. And never store anything directly on the floor if you can help it. Concrete wicks moisture, which can dampen cardboard and wood from below. A few wooden or plastic pallets will change your life here. We say the same thing when we help libraries protect collections: keep items off the floor and away from cold walls, and mold gets a lot less brave. See our archive tips that absolutely apply to storage units: Protect Books And Archives From Mold Damage.
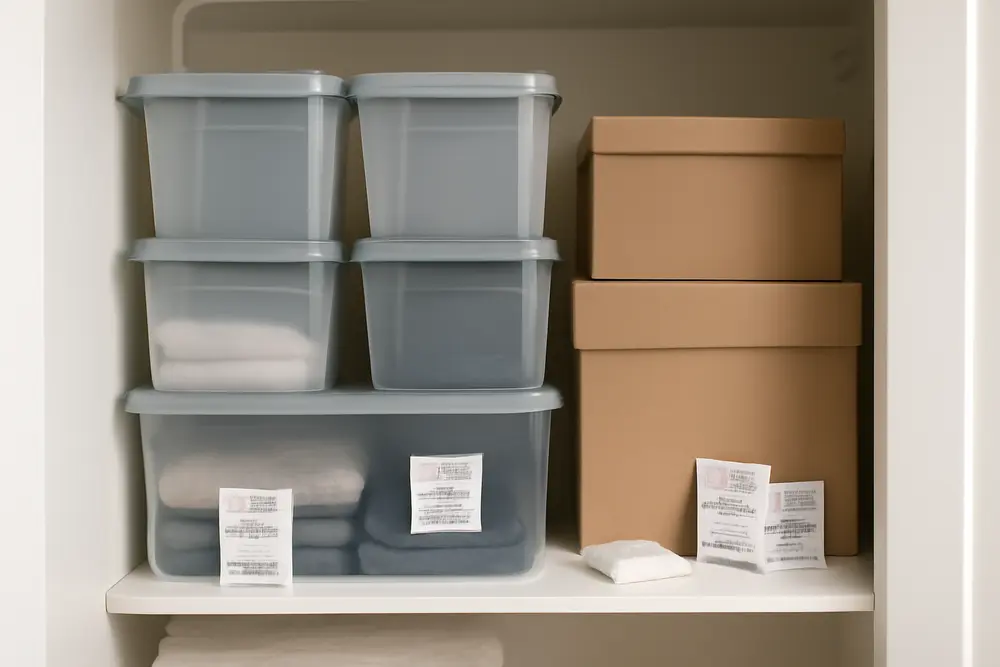
For keepsakes, plastic bins with tight lids are a good start, but they’re not magic. They slow down moisture exchange, which is perfect if you manage the moisture inside the bin. That’s where desiccants, especially silica gel packs, actually shine.
Silica Gel Packs: How They Help
Silica gel doesn’t kill mold. It just steals the one thing mold can’t live without: available moisture in the air. Silica gel is a thirsty little mineral that adsorbs water vapor and lowers relative humidity in closed spaces. That makes it ideal for micro-environments like plastic totes, garment bags, trunks, instrument cases, or sealed display boxes. Musicians have leaned on this for years, keeping instrument cases in the 40 to 50 percent RH range to protect wood and glue. Once the RH inside a container drops below roughly 55 percent, mold growth slows to a crawl. Below 50 percent, it’s basically on strike. For how this plays out in cases, see our instrument-care piece: Prevent Mold In Guitar Cases.
Silica gel is most effective in closed or semi-closed containers. Tossing a few tiny packets into an entire 10 by 10 unit won’t move the needle. But in the boxes that truly matter, it can make all the difference. Use indicating silica gel if you can find it. The beads or canisters change color as they load with moisture, so you know when to recharge them. If you use plain gel, add a humidity indicator card inside your bin so you can see when RH is creeping up.
How Much Silica Gel Do You Need?
The right amount depends on how sealed your container is, how dry you want it, and how often you’ll open it. Museum guidance from the Canada Conservation Institute offers a helpful high-end benchmark for airtight microclimates: plan around 50 grams of silica gel per liter of enclosed volume when you want aggressively low RH in a tightly sealed container. That’s a conservation-level dose intended for airtight setups. For typical household totes and trunks, you can often use less and still get a healthy RH drop, but more gel buys you more stability and longer intervals between recharges. See the CCI’s technical notes on preparing and reconditioning silica gel: Canada Conservation Institute: Silica Gel.
What you don’t want is a token packet doing nothing. If you’re storing a 60-liter tote of winter clothes, think in hundreds of grams, not a handful of 1-gram packs. For large furniture pieces covered with sheets, silica gel works best in adjacent closed spaces like drawers, cedar chests, or zipped garment bags near the furniture rather than loose on the floor under a sheet.
Recharging is simple. Most silica gel can be dried in an oven when it saturates. Many brands recommend 60 to 120 degrees Celsius until the indicator changes color or for a specified time. Packet materials matter, so check the label before baking. Paper sachets can scorch at higher temps, while metal canisters can handle the upper range. The CCI link above summarizes drying ranges and handling details. If you’re a serial baker of desiccants, buy canisters designed for reactivation to avoid mystery-melted packets on your cookie sheet.
Where to Place Desiccants
Placement is about proximity and containment. Put silica gel inside the same closed or semi-closed environment as the item you care about. Examples:
Inside plastic storage bins with clothing, bedding, or paperwork. Tuck canisters toward the top so you can check the indicator without a deep dig. Inside suitcases, trunks, and garment bags. For wedding dresses or uniforms in zippered bags, hang a canister near the bottom and another near the shoulders. In drawers and cabinets that will be closed in storage. One canister per compartment is better than one lonely pack in a big dresser. In archival boxes with photos and letters, use smaller pouches and keep them out of direct contact with delicate surfaces, especially if gel could sweat when saturated. Our archives guidance uses the same approach: desiccants belong in the box, not in the hallway outside it. Source: Protect Books And Archives From Mold Damage.
What about products like calcium chloride tubs? They can pull more moisture than silica gel, but they create liquid brine as they work. Use them with caution in a secondary container and keep them far from metals, fabrics, or wood finishes. For most personal storage, silica gel packs and good climate control are the cleaner solution. Manufacturer info from desiccant makers like Hydrosorbent backs up where these products shine: small, closed spaces that need steady dryness without spills. More here: Hydrosorbent.
Set a Simple Check-In Plan
Mold loves neglect. The easiest way to stay ahead of it is a quick check-in schedule. Start with monthly visits for the first three months while your unit’s microclimate settles, then shift to seasonal visits. Summer deserves extra attention in humid regions. Each visit should take 10 minutes and cover the same basics:
Look, smell, and touch carefully. Musty odor means moisture has been present long enough for spores to get bold. Feel for cool, damp concrete and look for condensation on the inside of lids or windows. Read the hygrometer. Keep one in the unit and aim for 30 to 50 percent RH. If you see 55 to 60 percent regularly, speak with the facility and adjust your setup. Swap or recharge desiccants. If indicators are spent, dry them in the oven and rotate fresh ones in. Reroute airflow. Pull items a few inches away from walls again, restack if your boxes have closed up all the gaps, and keep aisles clear. Handle leaks immediately. If you see staining, drips, or a puddle, move your items out of the splash zone while the facility addresses it.
Red Flags and Quick Fixes
If you spot early growth or high humidity, act before it mushrooms into a full cleanup.
Musty smell with no visible growth: dry the space. Add or upgrade desiccants in your boxes, increase airflow by adjusting spacing, and ask the facility about their HVAC status. Check RH in the unit and inside a couple of containers with indicator cards. Visible speckles on surfaces: treat lightly and smartly. For non-porous surfaces, wipe with a mild detergent solution, rinse lightly, and dry fast with fans. For painted or sealed wood, the same applies. For unfinished wood, textiles, or paper, skip wet cleaning. HEPA vacuuming and targeted dry methods prevent pushing spores deeper. Big patch or heavy spread: if the affected area is larger than about 10 square feet or involves valuable items, call a pro. Over-the-counter foggers and mystery sprays can make things worse, and ozone or chlorine dioxide products can damage materials. We can help you figure out the right level of response before you toss something you love.
Quick Reference
Here’s a compact cheat sheet you can actually use next weekend.
| Goal | Target | How To Hit It |
|---|---|---|
| Humidity in unit | 30 to 50 percent RH | Choose climate-controlled storage, keep items off floor, use a hygrometer |
| Humidity in bins | Below 50 percent RH | Add sufficient silica gel packs or canisters and indicator cards |
| Airflow | Clear paths and gaps | Leave space between walls and items, avoid wall-to-wall box stacks |
| Floor contact | No direct contact | Use pallets or shelving to prevent moisture wicking |
| Check-ins | Monthly, then seasonal | Inspect RH, swap desiccants, correct spacing, look for leaks |
FAQs
Can silica gel packs protect an entire storage unit?
Not realistically. Silica gel is best for closed spaces like bins, cases, and garment bags. A whole unit needs climate control to keep RH in the safe zone. Use both: climate-controlled storage for the room, silica gel packs for the containers.
How fast can mold grow in storage?
When humidity is high and surfaces are damp, mold can establish in as little as a day or two. In real-world storage units, it usually takes longer, but once RH stays above about 55 to 60 percent, the clock starts ticking. Keep RH in that 30 to 50 percent range and you’ve changed the game.
How many silica gel packs should I use in a 60-liter bin?
For airtight containers that you want very dry, museum guidance points to high ratios such as 50 grams per liter. That’s a conservation-grade approach. For typical bins, use as much as is practical and monitor with an indicator card. If the card stays below 50 percent RH for weeks, you’re in the sweet spot. If not, add more gel or improve the container seal.
Do I need to unwrap furniture in a climate-controlled unit?
Skip plastic wrap for long-term storage. Use breathable covers like cotton sheets and keep air gaps around each piece. Plastic can trap condensation, which is exactly what mold ordered.
Are pallets really necessary?
They’re cheap and effective. Concrete can wick moisture into cardboard and wood. Pallets or shelving break that contact and improve airflow. We recommend them for archives and for storage units for the same reason.
How often should I recharge silica gel?
When the indicator shows it’s saturated or on a schedule that matches your climate and opening habits. In humid summers, that might be every 4 to 8 weeks. In cooler months, less often. If you open bins frequently, plan on more recharges.
What RH should I aim for with instruments or fine wood?
Forty to fifty percent RH is the protective range for most wooden instruments and similar glued assemblies. Above roughly 60 percent, cases can become spore heaven even if the room is average. See our instrument guidance here: Instrument Care.
Real-World Pairings That Work
Here are a few simple combos that keep mold from turning your storage into a science project. Furniture and rugs: choose climate-controlled storage, cover with cotton sheets, leave 2 inches to the wall, elevate on pallets, and tuck silica gel canisters in nearby drawers or chests instead of taping them to furniture. Clothing and linens: pack fully dried items in gasketed bins with indicator cards and generous silica gel. Keep bins off the floor and stack with small gaps for airflow. Keepsakes and photos: use archival boxes, acid-free tissue, and silica gel pouches placed near corners without touching items. For leather jackets or bags, condition per maker directions, hang in breathable garment bags with a canister near the hem and another at shoulder height. Musical gear: treat cases like micro-rooms. Use two-way humidity packs or silica gel packs to stay near 40 to 50 percent RH inside each case, and store cases off the floor. The pattern is consistent: climate control for the room, silica gel packs for the containers, and a quick check every so often so you catch issues while they’re still tiny.
If you want help measuring what your storage setup is really doing, we can test humidity, inspect for early growth, and map out a simple plan that fits your unit and your stuff. Mold doesn’t have to be part of your storage story. Set the conditions, use silica gel packs where they matter, and your belongings will come out smelling like belongings instead of old basement.