Finished basements are amazing until that fresh paint job meets a summer humidity surge. The air turns swampy. The trim swells. Your nose catches that suspicious earthy note that says your lower level is about to host a mold party. Not on my watch. I am the mold pro who shows up with a hygrometer in one hand and dad jokes in the other. This guide cuts through myths, spells out finished basement humidity control with real world fixes, then shows you how to pick the right dehumidifier size so the air stays dry without your electric bill crying for help.
Why moisture control matters
Your finished basement sits below grade against cool concrete. Warm humid air meets cool surfaces then water condenses. That moisture soaks paper facing on drywall and wood trim. Mold takes that as a dinner invitation. The U.S. Environmental Protection Agency keeps it simple. The key to mold control is moisture control. You cut the water source and mold loses its fuel. For a public health overview and cleaning basics see the EPA’s mold pages at EPA mold and moisture control. I agree with that approach. It matches what we see on jobs. Reduce humidity and liquid water. Keep surfaces above dew point. Use finishes that do not feed growth. Your nose will notice the difference fast.
Finished spaces cost real money. Moisture problems hit your wallet twice. First you pay in repairs. Then you pay in energy waste because the air conditioner now works harder. A small leak from a window well can soak carpet pad in one afternoon. The next day spores go airborne. Your family breathes them. Your flooring bubbles. Your baseboards cup. One wet weekend can undo months of work.
The punchline is simple. Control liquid water at the exterior. Control vapor at the slab and walls. Control airborne humidity inside. That three part strategy prevents ninety nine percent of the headaches I get called to fix later.
Target humidity for basements
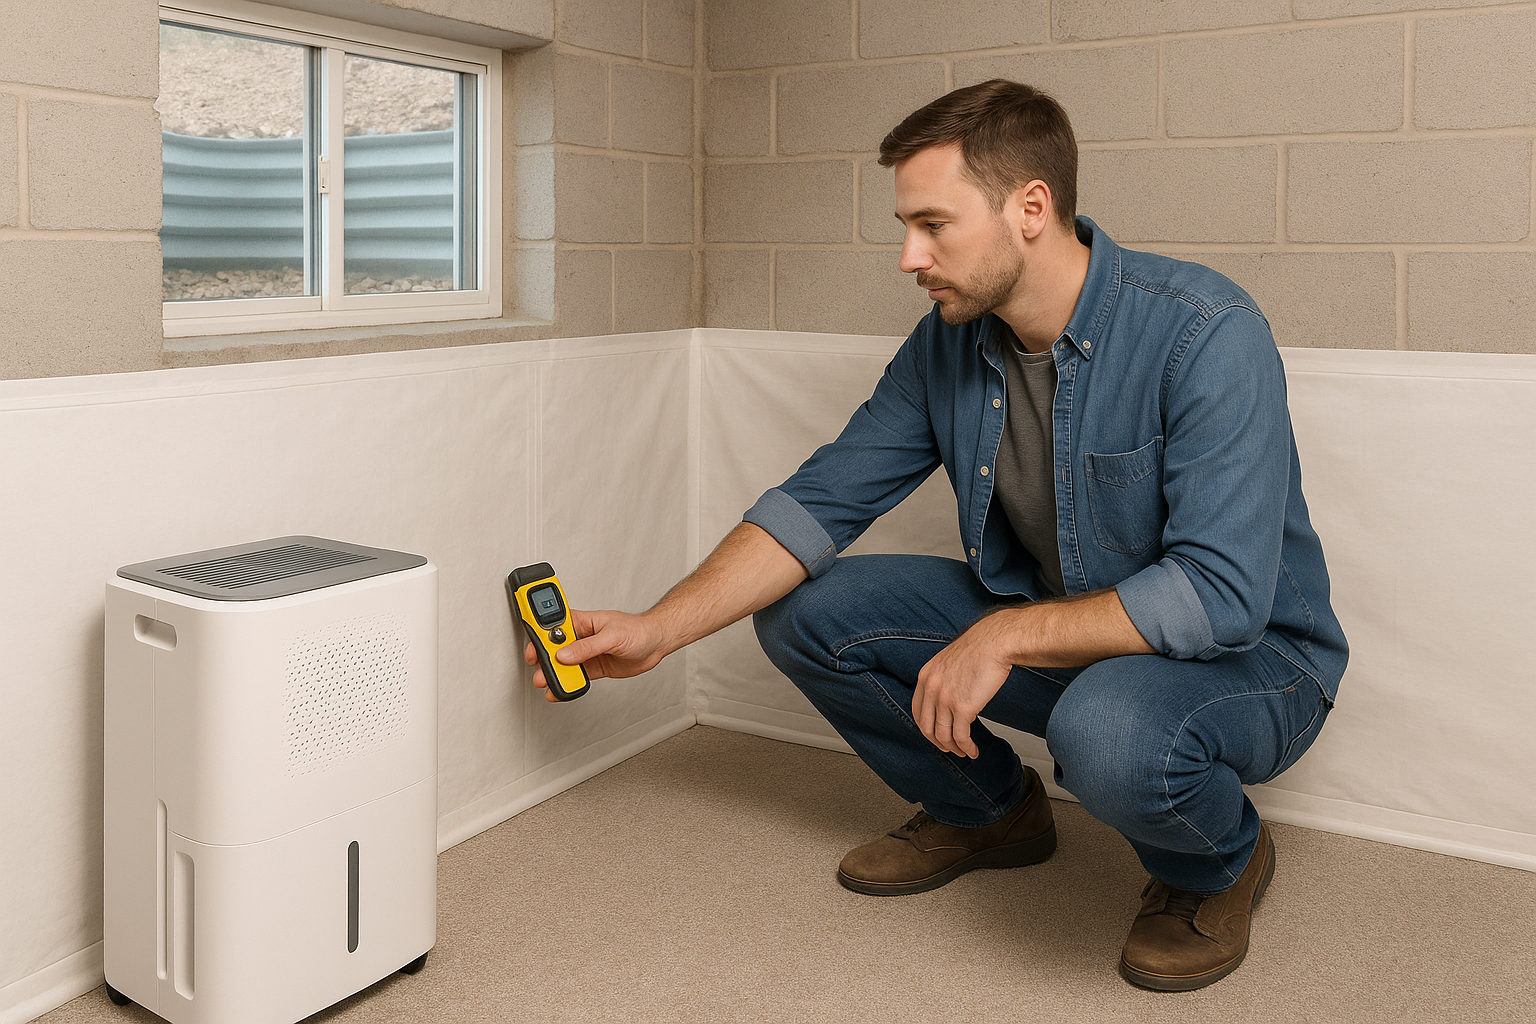
Let us talk numbers. For finished basement humidity control the sweet spot sits around forty to fifty percent relative humidity in summer. Many homes can stretch as low as thirty percent in winter without comfort issues. That range lines up with our own guidance on ideal indoor humidity levels. Why that range. Below thirty percent you get dry skin and cracking trim. Above fifty percent you flirt with condensation on cool surfaces and mold shows up fast. Place a digital hygrometer in the basement so you are not guessing. Check it a few times a week while you dial in your setup. Set your dehumidifier to about forty five percent. Then adjust for seasons and comfort. Mold control starts with that one habit.
If your basement regularly creeps past sixty percent in summer you likely have one or more hidden moisture sources feeding the problem. That might be soil vapor wicking through an unsealed slab. It might be a clogged window well drain. It might be outdoor air sneaking in through gaps around rim joists. Fix those sources so your dehumidifier is not trying to wring a river out of the air all day.
Basement dehumidifier sizing
Picking the right capacity is not a guess. ENERGY STAR publishes guidance that sets the baseline for capacity by room size and dampness level. Portable units for small rooms start around twenty to thirty pints per day for slightly damp conditions. Basements usually live in the very damp or wet category. That means plan toward fifty or more pints per day for many finished basements. You can read the full guidance at ENERGY STAR dehumidifiers. Real world unit capacities and tips also appear on Sylvane’s sizing page.
I want you to size with your head not your gut. Undersized units run non stop yet never hit your setpoint. Oversized units cycle off too quickly before they can reheat the air and mix it well. Aim for a capacity that can pull the space down to about forty five percent on a muggy day without running all night.
Quick capacity guide
The table below gives a simple way to think about capacity for finished rooms. Treat it as a starting point then adjust for your home’s quirks like foundation seepage or frequent door traffic to outdoors.
| Basement area | Slightly to moderately damp | Very damp | Wet or seepage present |
|---|---|---|---|
| Small room up to about five hundred square feet | Twenty to thirty pints per day | Thirty to forty pints per day | Thirty to fifty pints per day |
| Medium area five hundred to about fifteen hundred square feet | Thirty to fifty pints per day | Forty to sixty pints per day | Fifty to seventy pints per day |
| Large area over fifteen hundred square feet or many rooms | Fifty plus pints per day | Sixty to ninety five plus pints per day | Strongly consider a ducted whole home unit |
For bigger projects or whenever a portable unit runs non stop, a whole home dehumidifier solves the problem with less noise and better durability. Models like the Aprilaire series commonly remove fifty to ninety five plus pints per day and can be ducted into your HVAC return or supply. That gives you even humidity control across rooms. See capacity ranges at Aprilaire dehumidifiers.
Worked example
You have a one thousand square foot finished basement that smells musty in July. The hygrometer reads sixty to sixty five percent most afternoons. That fits the very damp profile. ENERGY STAR guidance says a portable in the forty to fifty pint range meets the minimum. Basements leak vapor from slabs and walls so I step up a notch. Choose a fifty to seventy pint unit. If that unit has to run nearly all day to hold forty five percent, go to a ducted whole home model in the sixty to ninety five pint class. Run a continuous drain to a sump so you are not emptying buckets while your friends are upstairs finishing the guacamole.
What makes a good basement unit
Basements run cooler than the rest of the house. Pick a unit with auto defrost and low temperature capability so coils do not ice up. Choose a model with a continuous drain port. If your drain line rises to a sink you will want either an internal pump or an external condensate pump. Keep the unit slightly elevated off cold concrete using a small platform. That improves air intake and helps with drainage.
Placement and drainage tips
Airflow matters more than brand sticker swagger. Place your dehumidifier where air can circulate from the largest path in the basement. Corners make poor homes for these machines. Keep supply and return grills clear of furniture. If a specific room gets damp after showers or laundry, place the unit closer to that source for a while then move it when the load changes. Sometimes two smaller units beat one big one in a chopped up floor plan.
Drainage should be automatic so maintenance does not rely on your memory. The best setup uses gravity to a floor drain or sump basin. Howard Environmental often routes a hose from the unit to the sump pit or to an exterior line where code allows. Our crawl space and basement article on vapor barrier and crawl space encapsulation also covers why routing to a sump makes life simple. If gravity will not cooperate a small condensate pump solves the lift. Test that pump each spring so a stuck float switch does not flood the floor. Whatever route you pick, keep the drain hose short with a smooth downslope and no kinks. Slime builds in lines over time. Flush them every season. Clean the unit filter monthly so airflow stays steady.
Window well drainage fixes
Window wells should rescue you from darkness, not drag water into your finished drywall. Dirt accumulates in wells over time. Drains clog. Then the sky opens up and your well fills like a bathtub. Water finds the path of least resistance which means right through the window frame or between the sill and the wall. The fix starts with inspection. Clean the gravel and silt out of the well. Make sure the well has a drain that ties into the perimeter drain or a sump. If the well has no drain at all, add one or extend a line into your sump system. Waterproofers call this a common failure point. See the discussion on window well drainage from industry sources.
Next check the basics outside. Downspouts should carry roof water well away from the foundation. The grade should slope away from the walls. A simple target works for most yards. About a six inch drop over ten feet away from the foundation performs well for surface drainage. The U.S. Department of Energy foundation guidance covers overall site drainage and water management at DOE ORNL foundation handbook. Add clear covers to keep leaves and toys out of wells. Do not use a cover that seals water against the wall. If you have ever pulled a soggy Lego from a well, you know why covers help.
After a heavy rain, check the wells for standing water. If they pool, you either have no drain connection or the line is blocked. That one check has saved more finished basements than any gadget I sell.
Vapor barriers and encapsulation
Liquid water gets the headlines. Vapor rises quietly from soil through a slab or from a crawl space. That vapor keeps humidity elevated even with no leaks. A continuous vapor retarder below or above the slab changes the game. The Department of Energy and Oak Ridge National Lab recommend a durable ground vapor retarder that is ten to twelve mil thick or a reinforced liner. Overlap and tape the seams. Turn the liner up the wall. Seal it. Combine that with perimeter drainage and a sump where needed. In many cases full encapsulation plus a dehumidifier or conditioned supply air delivers the most reliable long term result. See details at DOE ORNL guidance.
If you have a crawl space that connects to your finished basement, deal with that first. A wet crawl space will sabotage your basement forever. We break down durable liners, seam sealing, sump pumps, and practical maintenance in our article on vapor barrier and crawl space encapsulation. We prefer ten to twelve mil liners that turn up the walls. Seal all penetrations. Route the dehumidifier drain to a sump or to an approved exterior outlet. Do not tie it into house plumbing unless the code required air gap and trap are present.
After you control vapor and liquid water, that dehumidifier you bought can finally do its job without running itself into an early retirement.
Flooring that stays dryer
Your floor selection decides whether your basement smells like a new home or a tired gym bag. Mold loves cellulose. That means carpet pad, paper facing on drywall, raw hardwood, even the dust that collects on a concrete slab. Our guide on what surfaces mold grows on explains why certain materials are basically an all you can eat buffet for spores. In a finished basement I steer clients toward materials that do not feed growth easily. Luxury vinyl plank or tile looks sharp and handles seasonal humidity swings. Waterproof subfloor panels with an air gap prevent cold slab contact and reduce condensation risk. Porcelain tile can be excellent in spaces that see water occasionally. Epoxy or clear coat systems on a concrete slab make sense for workshop corners or exercise zones. If you want the look of wood, use engineered flooring over a proper subfloor with a true vapor strategy. Keep rugs small and washable.
Avoid glued wall to wall carpet directly on concrete. That setup traps moisture against the slab. The top feels fine while the pad below slowly turns into a biology project. If you love carpet for a media room use a raised subfloor with thermal break then a carpet tile system that pops up for cleaning. Nothing beats the ability to lift a few tiles, dry the area, then snap them back into place.
HVAC strategies that actually work
Air conditioning does some dehumidification during cooling cycles. Many basements need extra help because those cycles get short or sporadic. A ducted whole home dehumidifier ties into the return or supply of your HVAC system and keeps humidity steady across rooms without constant babysitting. The Aprilaire family for example has models rated for roughly fifty to ninety five plus pints per day. They can be set up with dedicated returns in the basement for targeted drying then share output through the supply ducts for mixing. Check product specs here: Aprilaire whole home units.
If you are relying only on the air conditioner to manage humidity, you may chase your tail. Lowering the thermostat further chills the space but may not drop humidity enough. Better to run a dedicated dehumidifier so temperature stays comfortable while RH hits the target. Set your dehumidifier to about forty five percent. Let the HVAC handle temperature. Let the dehumidifier handle moisture.
Keep the HVAC side clean. Replace filters on schedule. Check that the air handler condensate line drains freely. Dirty coils stall dehumidification capacity. Our seasonal mold prevention checklist covers simple tasks that keep humidity control on track. If you fight recurring growth in the same corner each season, we wrote a guide that spells out root cause hunting. Start with the moisture source, then humidity, then ventilation. See our plan to stop recurring mold before you repaint the same area for the third time.
What about air purifiers. HEPA filters reduce airborne spores. Activated carbon helps with musty odors. UV can treat some organisms that pass through. None of that fixes a wet slab or a clogged window well drain. Treat purifiers as a helper, not the hero. We break down the role of filtration in air purifiers and mold. Use one if allergies spike during cleanup. Do not use one as a substitute for moisture control.
Monitoring and maintenance
You cannot manage what you do not measure. Place at least one digital hygrometer in the finished area. Two is better. One near a basement bedroom. One near the laundry side or media room that tends to run warmer. Check readings weekly while you tune things. Keep the dehumidifier setpoint near forty five percent. Nudge it seasonally. Clean the intake filter monthly. Vacuum the coil fins gently if dust builds. Clear the drain hose. Pour a cup of vinegar through a condensate pump to discourage slime. Inspect window wells after a storm. Check gutters in spring and fall. This is not glamorous work. It saves you money.
Do a quick walk through once per season. Open a few closet doors in the basement to feel for cool stuffy air. Pull a bed or dresser away from an exterior wall to check for cold spots. If you store books or photos downstairs, keep them off concrete floors. Give them some breathing space on shelves. For special collections keep humidity near forty to fifty percent. We wrote tips for collections that need love here: protect books and archives. Contents tell the truth about your humidity story before walls do.
If you spot spots give us a shout. We are happy to inspect, test moisture, then build a plan that starts with water control. We would rather help you get it right once than come back every spring with a scrub brush.
Quick humidity control checklist
Print this. Tape it to the utility room door. When you complete the list you get bragging rights and a basement that smells like nothing, which is the smell of success.
| Target humidity | Hold between thirty and fifty percent. Use a hygrometer. See our guide to ideal indoor humidity levels. |
| Dehumidifier setting | Set around forty five percent. Enable continuous drain. Test pumps each spring. Clean filter monthly. |
| Placement | Central location with clear airflow. Elevate off slab. Move closer to trouble zones when needed. |
| Drainage checks | Clear window wells and add covers that shed debris. Confirm downspouts carry water away. Maintain that six inch drop over ten feet of yard if possible. |
| Vapor control | Use a durable liner with sealed seams. Turn it up the wall. Pair with perimeter drainage and a sump where needed. See vapor barrier and crawl space encapsulation. |
| Flooring choices | Favor vinyl plank, porcelain tile, or epoxy systems. Skip raw hardwood on concrete. Use carpet tiles only over a proper subfloor. Review what surfaces mold grows on. |
| HVAC upkeep | Replace filters on schedule. Keep coils and condensate lines clean. Use our mold prevention checklist each season. |
| When to call a pro | Persistent odor or visible growth means there is a moisture source you have not found yet. Start with our plan to stop recurring mold. Then book an inspection. |
Putting it all together
Finished basement humidity control does not require a miracle machine. It takes a little detective work and a few smart choices. Clear the window wells so heavy rain stays outside. Pitch the yard away from the foundation. Give vapor a sealed path so it does not bleed into your living space. Pick flooring that laughs at moisture. Size the dehumidifier with data not hope. Keep that unit clean and draining. Use your HVAC to mix air so humidity stays consistent across rooms.
If you want help with sizing or a second set of eyes on vapor control details, we do this all day. We can measure RH, run a blower door if needed, then spec a portable unit or a ducted whole home setup that fits your space. We can also handle remediation if growth already moved in. Reach out to Howard Environmental. We will bring the hygrometers, the moisture meters, the sump covers, and a bad pun or two. Your basement will bring the silence. That fresh nothing smell beats musty every time.