Mini-splits are the introverts of HVAC. They hang quietly on the wall, sip watts, and never call attention to themselves. Then one day you catch a whiff of dirty-cheese-in-a-gym-bag, spot a mysterious black fringe on the blower, and realize your polite little comfort machine has been throwing a biofilm party behind the grille. If that sounds familiar, welcome to the ductless mini-split biofilm problem. I inspect, test, and clean mold for a living, and mini-splits are repeat offenders. Here’s why they grow slime and how to shut the party down with a prevention plan that actually sticks, including filter wash cadence, coil and blower deep-clean intervals, drain line flushing, humidity setpoints, dry mode strategy, and sensible add-ons. Consider this your condensate pan hygiene manifesto.
What Exactly Is Mini-Split Biofilm?
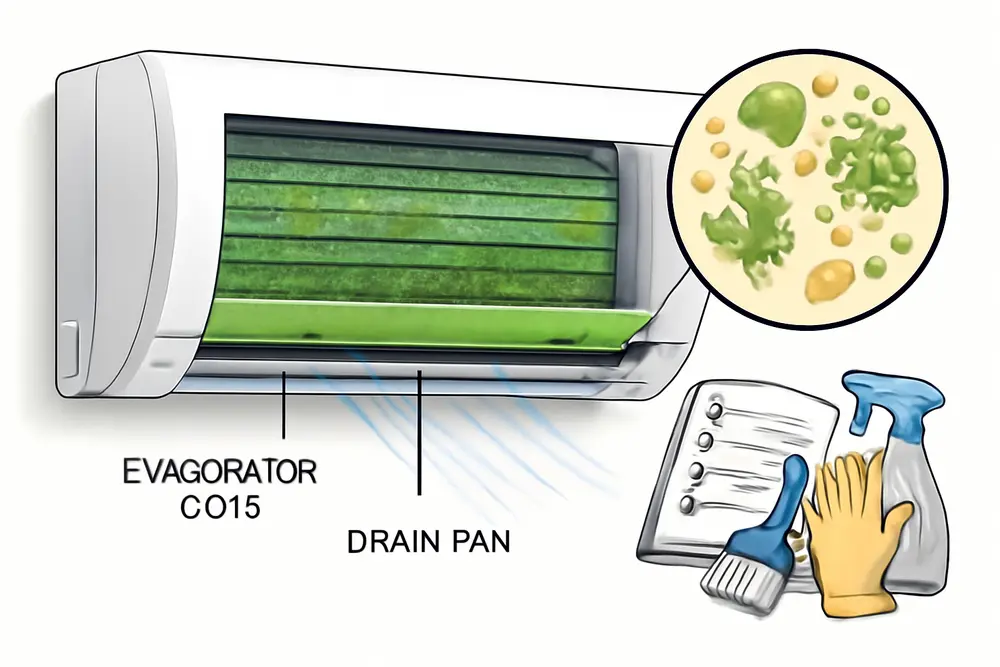
Biofilm is a sticky, layered community of microbes that cling to moist surfaces and bond themselves together like a tiny HOA with no sense of boundaries. In a mini-split, that means mold, bacteria, and algae living on the evaporator coil, plastic housing, blower wheel, and condensate pan. Give them three things and they thrive: constant moisture, a touch of warmth, and something organic to eat. Mini-splits deliver all three, especially when the indoor coil stays cold, the fan runs low, and dust or cooking aerosols get past the basic filter. Once biofilm sets up shop, you get musty odors, allergy flare-ups, and gradually worse performance as airflow and heat transfer drop.
Why Do Mini-Splits Grow Mold?
Short version: they’re moisture factories with quiet-mode habits that keep everything damp. Long version: your ductless head chills air across an evaporator coil. That coil sweats as it pulls moisture from the room. The water drips into a condensate pan and out a drain or pump. In a lab, the coil would dry out between cycles and life would be grand. In the real world, a few design quirks create perfect biofilm conditions.
Always-Wet Coils
The coil surface is below the dew point during cooling, so condensation is constant. Add tiny bits of dust, skin cells, and kitchen aerosols that sneak through the basic screen filter, and you’ve built a micro buffet. If the fan shuts off right after the compressor stops, the coil never gets a chance to dry. Moisture lingers, and microbes level up.
Quiet Mode And Low Airflow
We all love whisper-quiet, but low fan speed means less airflow over the coil. Less airflow means slower evaporation. That “silent night” setting is also a “stay wet and grow stuff” setting. Auto modes that drop fan speed fast at the end of a cooling call have the same effect.
Hidden Condensate Pans
Condensate pan hygiene matters. Many mini-split pans are shallow and tucked behind plastic. If the unit isn’t level, if the pan lip grows slime, or if the drain line partially clogs, you get puddling. Stagnant water becomes a resort for algae and biofilm. If a condensate pump is installed, its tiny reservoir can be a mold jacuzzi when neglected.
High Indoor Humidity
Rooms hanging out above 55 percent relative humidity mean the coil stays wet longer and cycles more often. Short bursts of cooling followed by long idle periods keep everything perpetually damp. Basements, bathrooms, and kitchens are frequent offenders. The result is dew-on-metal with minimal dry time, which microbes adore.
Blower Wheel Neglect
Owners rinse filters and call it a day, but the blower wheel collects the finest dust and becomes a fuzzy carousel. That mat catches condensate spray and starts growing. Once the wheel turns into a petri dish, it redistributes spores across the coil and housing.
Early Clues You Have Growth
Your nose is usually first on scene. A musty or “dirty sock” odor when cooling starts or stops is a dead giveaway. Look closer with a flashlight. Check the leading edge of the blower wheel vanes, the plastic immediately behind the louvers, and the area above the condensate pan. You might see black specks, green smear, or tan slime. If you notice water dripping from the fascia, a slow drain is likely. Allergy symptoms that show up only in the room with the unit are another common flag. Left untreated, the head may also short cycle more and use extra energy as heat transfer falls.
The Biofilm Playbook
You do not need a hazmat team every spring. You need a steady, boring plan that breaks the moisture and food cycle. Here’s the practical routine I give to clients who want a clean coil and fresh air year round. We’ll keep it simple, safe, and repeatable.
Filter Wash Cadence That Works
Wash or replace the screen filters every 1 to 3 months, monthly if you have pets or cook often. Power the unit down. Pop the grille and remove the filters. Rinse from the clean side out with lukewarm water. If they’re greasy, use a drop of mild dish soap, then rinse well. Let them dry fully before reinstalling. Wet filters are invitations to mold. Do not spray fragrance cleaners on filters. You’re not trying to make your lungs smell like a department store.
Coil And Blower Deep-Clean Intervals
Plan a real cleaning once each cooling season. Twice if you live in a humid climate or run in quiet modes a lot. You will want a mini-split cleaning bag, soft nylon brush, non-acidic coil cleaner rated for evaporators, and low-pressure rinse in a controlled way. Kill power to the unit. Cover electronics and wall with plastic. Gently brush loose dust from the coil fins. Apply the coil cleaner per label, let it dwell, then rinse lightly into the bag. Do not pressure wash fins. Clean the blower wheel with a foaming cleaner designed for HVAC plastic and a soft brush while slowly rotating the wheel. Wear gloves and eye protection. If you’re hesitant about access or the unit is heavily fouled, schedule a pro cleaning. A careful deep clean usually outperforms five years of perfumed sprays and crossed fingers.
Drain Line Flushing And Condensate Pan Hygiene
Quarterly flushes keep slime from colonizing your drain. If you’ve got gravity drain, locate the service tee near the air handler or at an accessible point in the line. Pour a cup of white vinegar, let it sit 15 minutes, then chase with clean water. For pumps, follow manufacturer guidance and clear the reservoir. If you can access the condensate pan inside the head, wipe slime film with a non-abrasive cloth and a mild coil-safe cleaner. Avoid bleach in the head unit. Bleach can corrode metals, pit coil fins, and create fumes you’ll breathe. If you like pan tablets, choose non-corrosive types designed for mini-splits and follow the label. If the head is not level or water stands in the pan after a cycle, correct the slope and inspect the drain line for kinks or biofilm plugs.
Humidity Setpoints That Actually Help
Shoot for 40 to 55 percent relative humidity indoors. That range reduces condensation without turning your home into the Sahara. Use a reliable hygrometer in the same room as the mini-split. Many heads have a dry or dehumidify mode that targets humidity rather than just temperature. Close windows and doors while conditioning, run bath exhausts and range hoods when creating moisture, and fix water leaks quickly. If your home stays stubbornly humid, a standalone dehumidifier can support the mini-split, especially in basements.
Dry Mode Versus Auto
Auto modes often stop the fan the moment cooling ends, which leaves a wet coil. Train the unit to dry itself. Use dry mode, or at least run the fan for 15 to 20 minutes after the compressor cycles off. Some brands call this coil dry or X-fan. If your head is stuck on quiet all the time, bump fan speed up for that post-cooling dry period. It is a small energy trade for a big mold prevention win. If the model lets you program a short dry cycle after cooling, do it.
Add-Ons That Curb Regrowth
When maintenance alone is not enough, consider targeted add-ons. UV-C lamps that bathe the coil surface can limit biofilm between cleanings. Look for shielded, mini-split rated kits that keep UV off plastic parts and wires, and choose options marketed as ozone free. Needlepoint or plasma ionization modules sized for ductless heads can help reduce airborne microbes and odors in the airstream, but they do not replace cleaning. Any add-on can affect warranties if installed poorly, so coordinate with a qualified HVAC tech. Treat UV and ion as assistive tools, not magic wands.
DIY Or Call A Pro?
If you are dealing with a faint odor and mild dust, a DIY routine with filters, a careful coil rinse, and a drain flush is reasonable. If you see heavy matting on the blower wheel, slime building on interior plastics, repeat clogs in the condensate line, or if you have anyone in the home with asthma or immune concerns, bring in a tech who actually specializes in mini-split cleaning. Pros use protective cleaning bags, non-atomizing sprayers, and know how to keep runoff out of your wall and electronics. Expect a competent deep-clean per indoor head to run a few hundred dollars, more if the system is severely fouled or access is tight. If you suspect mold has spread beyond the head into building materials, schedule a mold inspection and testing, then remediate sources and correct moisture. Cleaning the mini-split without handling a damp wall or leak next to it is like brushing your teeth while eating taffy.
Quick Reference Maintenance Table
| Task | Frequency | Practical Tips |
|---|---|---|
| Filter wash or replacement | Every 1 to 3 months | Rinse from clean side out, dry fully before reinstalling |
| Coil and blower deep-clean | Once per cooling season | Use coil-safe cleaner and low-pressure rinse, protect electronics |
| Drain line and pan flush | Quarterly, monthly in humid areas | Vinegar soak then water, clear pumps per manufacturer |
| Humidity setpoint | Continuous, monitor weekly | Target 40 to 55 percent RH, use dry mode as needed |
| Dry fan run after cooling | Every cooling cycle | Run dry or fan 15 to 20 minutes to dry the coil |
| Add-ons like UV-C or ion | As needed for recurring growth | Use ozone-free, mini-split rated gear, install by a pro |
Real-World Tips That Save You Headaches
Keep the area under the head clear so airflow is not blocked by bookcases or curtains. Level the indoor unit during install and recheck if you see drips. If you use a condensate pump, listen for odd cycling sounds and test it at least twice a year. That little reservoir should not be a swamp. Never use high pressure or steam on the indoor coil. You can fold fins, blow water into electronics, or drive gunk deeper. Skip scented sprays. They mask odors and leave residues that actually feed biofilm. If your kitchen head gets greasy, wipe the fascia and louvers monthly with a coil-safe cleaner. Grease is compost for microbes.
Signs Your Condensate Pan Needs Attention
Water dripping from the front of the unit or down the wall means the pan is overwhelmed or tilted. A chirping or bubbling noise during shutoff can be water sloshing in a partially blocked pan. Musty odor that spikes when the unit stops is often the pan steaming off funk as the coil warms up. Pull the grille, look for standing water after a cooling call, and check the drain line for kinks or biofilm strings. For condensate pan hygiene, wiping the lip and corners during seasonal deep cleans goes a long way. If the pan looks warped or cracked, replace it. Patching with tape is a temporary move that usually fails at the worst time.
What To Ask A Service Provider
If you hire someone to clean your ductless head, ask how they protect the wall and electronics, what cleaners they use, whether they clean the blower wheel, and how they handle the condensate pan and line. Ask if they will run the unit before and after and check humidity in the room. A good tech cleans to bare plastic and metal without leaving chemical odors. If they suggest blasting the coil with a pressure washer or filling your home with a fog that promises to kill everything, find another provider. Killing everything in the head is not the goal. Removing the biofilm and fixing the moisture pattern is.
Frequently Asked Questions
Is Bleach Safe On Mini-Split Coils?
No. Bleach can corrode metals, damage coatings, and generate fumes you will breathe. Use coil cleaners labeled for evaporators, then rinse. For the drain line, white vinegar is a safer routine flush.
Why Does My Mini-Split Smell Like Dirty Socks?
Microbial growth on the coil and blower is the classic cause. When cooling stops, moisture warms and releases a musty odor. Clean the coil and blower, flush the drain, and start running a dry cycle after cooling calls. That usually fixes the “gym bag” vibe.
What Humidity Level Should I Aim For?
Keep indoor RH between 40 and 55 percent. Below 40 percent you start drying out people and wood. Above 55 percent, the coil stays wet longer and biofilm grows faster.
Does UV-C Void My Warranty?
It depends on the equipment maker and how the UV is installed. Some manufacturers are fine with purpose-built UV kits placed to avoid plastics and wires, others are not. Always check your manual and have a qualified tech install any UV or ion system.
Can I Just Run Fan Only To Dry The Coil?
Fan only is better than nothing if it runs 15 to 20 minutes after cooling, but dry mode often does a better job since it manages coil temperature and airflow to remove moisture. Use what your model supports and test what stops odors in your space.
My Drain Line Keeps Clogging. What Now?
Increase your flush cadence, inspect for sags or kinks, and consider adding an access tee for easier service. If you have a pump, clean or replace it as needed. Heavy algae growth may call for an enzyme-based cleaner designed for HVAC drains.
How Do I Know If The Blower Wheel Is Dirty?
Shine a flashlight up at the wheel vanes behind the louvers. If they look fuzzy, dark, or scalloped with buildup, they need cleaning. A clean wheel has crisp edges and uniform color, not a shag carpet look.
The Owner’s Shortlist For A Clean Mini-Split
If you want the ductless mini-split biofilm problem handled with minimal drama, stick to a few habits. Keep RH in the 40 to 55 percent band. Wash filters on a real schedule, not when you happen to think of it. Deep-clean coil and blower each cooling season. Flush the drain line regularly and keep condensate pan hygiene tight. Favor dry mode or a 15 minute fan run after cooling instead of pure auto. If growth keeps returning, add UV-C or ion carefully and get a pro to check slope, pump function, and blower balance. And if your unit has already gone full science experiment, call in a cleaner who knows mini-splits, not just central air. Your nose, your lungs, and your energy bill will appreciate the upgrade.