Camera lens fungus is a moisture problem first and an optics problem second. High humidity, trapped air, and poor storage conditions create the same kind of environment that mold professionals see in walls, crawlspaces, and HVAC systems every day. The difference is that on camera lenses, the damage can become permanent much faster.
This guide breaks down dry cabinet vs dessicant storage, ideal humidity levels for camera gear, early signs of lens fungus, and the safest ways to reduce moisture exposure before expensive optics are damaged.
Why Lenses Grow Fungus
Fungus isn’t picky. If you give it three things for a few weeks, it throws a party on your optics: high humidity, warm temperatures, and still, dark corners. Relative humidity over about 60 percent is the fast lane for mold growth. Typical indoor temps where humans feel comfy are also fine for fungus, roughly 50 to 95 degrees Fahrenheit. Pack your lens into a camera bag or case that never sees daylight or airflow, and you’ve just checked every box. The spores are already everywhere. Your job is to starve them of moisture and make life inconvenient.
Think of it as the fungus triangle: moisture, warmth, and darkness. Break just one, and growth slows way down. Break two, and you’re in safe territory. Consistent humidity control is the easiest win, which is why smart storage beats obsessive cleaning every time.
Ideal Humidity For Camera Gear
For long-term storage and daily life, aim for an environment at 30 to 50 percent relative humidity. That keeps surfaces dry enough to discourage growth without drying out rubber parts or lubricants. Inside a dedicated storage container like an electronic dry cabinet, 40 to 50 percent is the sweet spot. You can run a bit lower, around 35 to 40 percent, if you’re in a tropical climate or your building routinely sweats. Just avoid living below about 30 percent for months on end, since that can shrink gaskets and thicken grease in focus or zoom assemblies.
One more quick rule: temperature swings are fine as long as humidity stays controlled. If your air is cool and dry, fungus sulks. If it’s warm and dry, it sulks. If it’s warm and wet, it sends invitations.
Dry Cabinets Explained
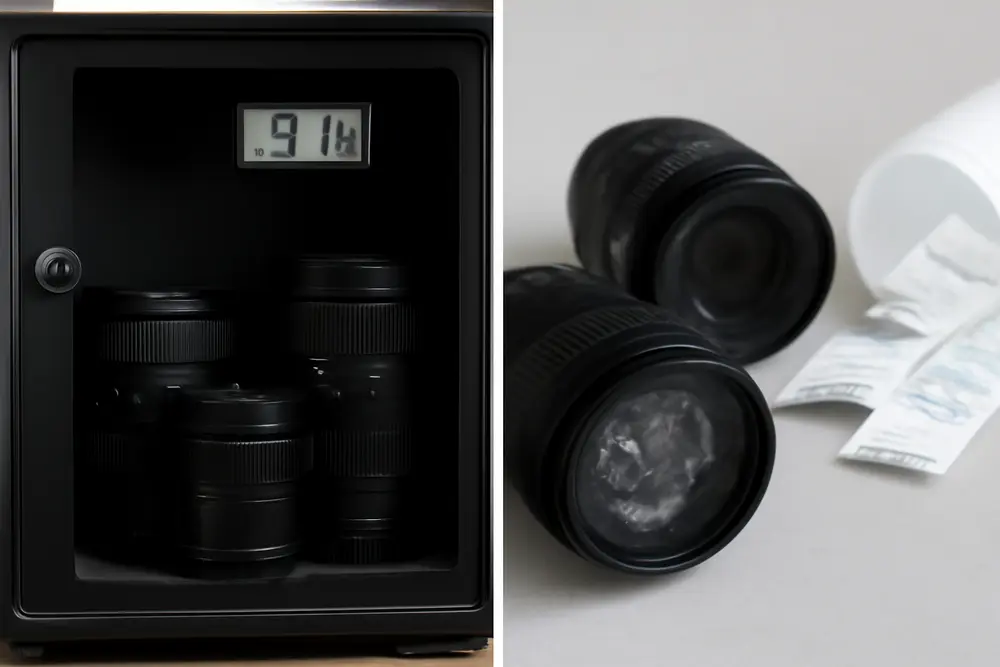
Electronic dry cabinets are humidity-control boxes designed for cameras and lenses. Inside, a dehumidifying module and a controller maintain a target RH. You set 40 to 50 percent, it holds that number, and the built-in hygrometer lets you check at a glance. Shelves are usually padded, doors seal well, and most units add interior lights because photographers love a dramatic reveal, even when grabbing a 50 mm.
Why they work: consistency. When RH outside swings from swamp to sauna, the cabinet just shrugs and holds steady. There’s no guesswork on how many packets to toss in or when to bake them dry. For multi-lens kits or anyone who shoots weekly, a cabinet is the least fussy path to long-term protection.
What to consider when shopping: capacity in liters, RH adjustment range, hygrometer accuracy, door seal quality, and whether it retains settings after a power blip. Small cabinets start around 18 to 30 liters for a body and a few lenses, with larger units climbing to several hundred liters for full studios. Cost is higher up front, and yes, it needs power. But once it’s on, maintenance is basically set-and-forget with a monthly glance at the display.
Desiccants And Sealed Cases
If you need portability or a lower-cost setup, desiccants inside a good sealed container can do solid work. Standard silica gel packs absorb moisture. Color-indicating silica gel adds a simple bonus: the beads change color when saturated, so you know when to recharge them. Two-way humidity-control packs do both absorption and release, buffering the space around a target RH like 45 to 49 percent. Pair either with an airtight container and a small digital hygrometer, and you have a pocket dry room.
Containers that actually seal: hard cases with gasketed lids, thick plastic storage bins with latching tops, and quality zip bags rated for repeated sealing. Flimsy bags and old cases with cracked gaskets are the quickest route to false confidence. Use enough desiccant for the volume you’re drying, then let the hygrometer tell you if you hit your mark. If you’re not landing in the 40 to 50 percent range, you either need more desiccant or a better seal.
Maintenance is the catch with desiccants. You will need to check RH regularly and recharge or replace packs. Baking silica gel dry works in a home oven if the product allows it, or you can buy plug-in rechargeable canisters. Two-way packs get replaced on schedule depending on how humid your environment is. For travel and field kits, this tradeoff is worth it. For a home base with six lenses and two bodies, babysitting bags get old fast.
Dry Cabinet vs Desiccant
| Feature | Dry Cabinet | Desiccant + Sealed Case |
|---|---|---|
| Humidity Control | Automatic and steady at 40 to 50 percent | Manual and variable based on packs and seals |
| Monitoring | Built-in hygrometer, glance | Add a small hygrometer and check often |
| Cost | Higher up front, low ongoing effort | Lower up front, ongoing pack replacements |
| Maintenance | Minimal after setup | Regular recharging or replacing packs |
| Portability | Stays put and needs power | Travel-friendly and no power needed |
| Best For | Home studio and growing gear kits | Travel, fieldwork, and emergency drying |
Here’s the straight talk. If your gear mostly lives in one place, a dry cabinet gives you fewer ways to mess up and better long-term camera lens fungus prevention. If you’re constantly on the move or you’re protecting a single lens on a budget, desiccants plus tight seals are perfectly fine as long as you monitor and maintain.
Plenty of shooters run a hybrid. Keep the main kit in a dry cabinet at 45 percent RH. Load travel cases with two-way humidity packs and a tiny hygrometer. Rotate used packs into a bag labeled Needs Recharge and schedule one day a month to bake, swap, and reset. Simple beats heroic every time.
Early Signs You Can Catch
Fungus usually starts near edges or in shaded areas. With a bright flashlight at an angle, look for thin, web-like threads or fans that look like tiny frost patterns. That spiderweb aesthetic is gorgeous in macro nature shots and ugly inside a 24 to 70. A persistent haze that does not wipe off the front or rear element is another red flag. Some lenses take on a faint musty odor if growth has started in the barrel or under rubber grips. Finally, some small spots won’t move when you gently tap the lens. Dust will shift. Fungal colonies hold still.
Inspect monthly. It takes two minutes. Pull each lens, point a bright light through from behind, and scan slowly while changing angles. Early detection can be the difference between a quick cleaning of accessible surfaces and paying for a teardown or, worse, discovering etched coatings that never fully recover.
DIY Cleaning That Will Not Wreck Optics
If you catch very early growth on exterior glass or right at the rim of an accessible surface, you can do a careful clean. Do not open the lens. Do not flood it with liquid. The goal is to remove what is reachable, then get the lens dry and stored correctly so the problem does not return.
What you need: lens cleaning solution or quality optical cleaner, distilled water, clean microfiber or lens tissues, blower, bright flashlight, nitrile gloves, cotton swabs for edge work, and a stable workspace with low humidity.
- Power down the camera and remove the lens. Use a blower to remove loose dust before anything touches the glass.
- Light the element from the side and map where the growth is. If it is deep inside or looks like branching webs under the surface, stop. That is a job for a pro.
- For a front or rear element, lightly moisten a lens tissue with cleaner. Wipe in gentle arcs from the center outward. Do not scrub. Follow with a dry, clean tissue.
- For edge spots at the rim, use a barely dampened swab and minimal pressure. Avoid letting moisture creep under the retaining ring.
- Let the lens air for a few minutes in a clean, dry area. Then store it immediately in controlled RH at 40 to 50 percent.
What not to use: vinegar, hydrogen peroxide, bleach, alcohol-heavy home mixes, or UV lamps aimed point-blank at your glass. Those either leave residues, risk damaging coatings, or solve nothing while introducing new problems. Sunlight can slow fungal activity, but baking a lens on a windowsill cooks lubricants and adhesives. Keep your hero shots for golden hour, not for sterilizing optics.
When To Call A Pro
Internal growth between elements, web patterns spreading inward, or anything that looks etched is not a DIY moment. Lenses are aligned to tight tolerances. Opening them without the right tools, torque, and service data can leave you with decentering, dust behind elements, or a loose focus assembly. If coatings are etched, cleaning will remove the fungus but not the marks, so you need an honest estimate on whether the fix is worth it relative to the lens value.
Call a professional when you see branching threads under glass, any haze that resists external cleaning, or when gears, AF motors, or aperture blades feel sluggish after a damp shoot. Also, call a pro if the lens is collectible or expensive. Spending modestly to keep a top-tier lens correct beats saving 30 bucks today and living with soft corners forever.
Storage Setups That Actually Work
If you live in a humid climate, make the dry cabinet the home base. Set it to 45 percent and keep all frequently used bodies and lenses inside. Leave a small gap between items for airflow. If you come home from a rainy or beach shoot, let the gear air out in a clean, dry room for 30 to 60 minutes before shelving it. That prevents trapping salty or damp air in the cabinet.
For travel, pack lenses in a gasketed hard case with two-way humidity packs labeled 49 percent and a card-sized hygrometer. If the reading creeps above 55 percent, swap in fresh packs. Do not cram wet straps or damp microfiber cloths in the same case. That is like tossing a humidifier into your gear bag and hoping for the best.
For budget sets, use a tight-latching plastic bin with a rubber seal. Add indicating silica gel canisters sized for the bin and verify you land between 40 and 50 percent by morning. Write the check date on masking tape and stick it to the bin. If you are not into gadgets, set a recurring calendar reminder. Mold loves procrastination.
Pro Tips For Daily Prevention
Keep fingers, breath, and mystery smudges off your elements. Skin oils feed spores, then hold moisture. Wipe barrels and caps occasionally so grime does not migrate inside. Do not store lenses long-term with both caps vacuum-sealed in a swampy room. Let gear see light and fresh air every so often, even if that is just during your monthly inspection. Track RH inside storage and in the room nearby. If the building’s air is always at 65 percent or higher, a room dehumidifier plus a dry cabinet is not overkill. That combo keeps spores hungry and cranky.
Choosing a Dry Cabinet or a Desiccant?
If you own more than two lenses and you shoot year-round, a dry cabinet is the highest percentage play. Set 45 percent RH, load shelves, live your life. If you shoot part-time, live in a drier climate, or you are saving for glass that actually sparks joy, desiccants and sealed cases are totally fine if you add a hygrometer and stay on top of recharges. If your year looks like studio work at home plus adventure travel quarterly, go hybrid. Main kit in the cabinet, travel kit in airtight cases with two-way packs. Keep it boring and consistent, and fungus will get bored too.
How To Spot Trouble Fast
Schedule a 10-minute gear check once a month. Flashlight test every lens. Note anything that looks like silver frost at the edges, persistent mist inside, or spots that are glued in place. Sniff the bag. Musty means moisture. If you catch it early on the surface, do a cautious clean, then upgrade storage. If it looks internal, line up a service quote and park the lens in controlled RH so it does not advance while you decide.
Frequently Asked Questions
Is it safe to store lenses below 30 percent RH?
Short stints are fine, but long-term ultra-dry storage can harden lubricants and shrink gaskets. Aim for 40 to 50 percent for the long haul.
Can I kill fungus with sunlight?
Direct sun can slow fungal activity, but it also heats the lens and can age adhesives and lubricants. Use controlled humidity instead. Light is not your main tool here.
Do I need to keep caps off for airflow?
No. Keep caps on to protect from dust and handling, then use proper humidity control. Controlled RH beats leaving optics exposed.
Will fungus spread to my other lenses?
Fungal spores are already everywhere, but a lens with active growth suggests your storage is humid. Fix the RH, and you starve spores across the board.
Can I use rice as a desiccant?
Rice is a snack, not a humidity strategy. Use real desiccants or two-way humidity packs and measure results with a hygrometer.
If coatings are etched, is the lens ruined?
Not always. Light etching might have minimal impact on images. Heavy etching can lower contrast or produce flare. A pro can evaluate and quote a clean, then you can decide based on test shots.
Your 10-Minute Monthly Routine
Keep a microfiber and a flashlight in your cabinet or case. Once a month, check humidity readings, scan every lens against light, wipe the barrels and front elements if needed, and replace or recharge any desiccants that have dried out. That is it. No heroics. Consistent 40 to 50 percent RH, a clean exterior, and a quick scan routine will beat fungus so thoroughly that it will start applying for work in your compost bin instead. If you ever hit a case that looks beyond a safe wipe, stop, stabilize humidity, and call a qualified service tech. Your images will thank you, and you will never again confuse bokeh with biofilm.