If your container home or office wakes up with steel wall sweat and a suspicious funky note in the air, congrats, you own a very stylish rain cloud. Containers are steel boxes that love to chill faster than your ex. When warm, moist indoor air kisses a cold metal surface, you get condensation. That moisture fuels hidden mold, rust, and the general unraveling of good moods. The fix is not a single gadget. You need a system: a real vapor control layer, insulation that breaks thermal bridges, smart airflow, and container dehumidification that actually hits target humidity. Let’s make your container dry, year-round, without turning it into a sauna or a sock drawer.
Why Steel Walls Sweat
Steel conducts heat as if it is trying to win a speed record. When outside temperatures swing, the interior steel surface can drop below the dew point of your indoor air. The dew point is the temperature at which water vapor turns into liquid. You might not see the first drips because condensation often starts on the coldest hidden surfaces: the bare corrugations, steel studs, fasteners, and uninsulated corners. Those are thermal bridges. They bypass insulation and become little waterfalls for your wall cavities.
Now toss in daily life. Every breath, shower, boiling pot of pasta, and wet umbrella adds moisture to the indoor air. If the container’s envelope is not insulated properly and you do not manage humidity, that water vapor will find the cold metal and condense. Steel does not absorb moisture like drywall or wood, so it sits on the surface or runs downward into seams and under floors. That is prime real estate for mold and rust to get comfy.
Mold Loves Condensation
Mold growth speeds up once relative humidity hangs out above about 55 percent. We prefer to pin indoor RH in the 40 to 50 percent range. Below roughly 50 percent, most molds throttle way down. In a container, condensation pushes local RH at the steel surface to 100 percent. That means wet insulation edges, soggy plywood, and mold parties in places you cannot see. If you insulate loosely or leave air gaps against the steel, you are basically building a secret rainforest behind the wall finish.
Build A Real Vapor Control Layer
You cannot fan away the laws of physics. You have to block vapor where it wants to go and stop heat from short-circuiting through the steel. That starts with a continuous vapor control layer paired with continuous insulation. Do not confuse air control and vapor control. You need both. Air leaks move far more moisture than vapor diffusion, so seal the air first, then manage vapor with the right materials in the right place for your climate.
Closed-Cell Spray Foam On Metal
Closed-cell spray foam is a rock star on steel. It does three things at once: air seals, insulates, and creates a strong vapor control layer right on the metal. The foam bonds to the corrugations, fills every micro-gap, and prevents moist indoor air from touching cold steel. It also has a high R-value per inch, so you get good thermal resistance in a tight space. Aim for enough thickness to keep the interior foam surface above the dew point most of the year. The right thickness depends on your climate and whether you add more insulation inside or outside. The crucial part is continuity. No bare steel left behind, including posts, roof ribs, and tricky seams.
Skip loose batt insulation directly against steel. Fiberglass or mineral wool can work in containers, but only when paired with a proper air barrier and a plan to eliminate thermal bridges. If you are not gluing every fiber to the steel, air will find it and so will condensation.
Exterior Insulation And Thermal Breaks
If your design allows, exterior rigid foam or mineral wool panels are excellent allies. Putting continuous insulation on the outside keeps the steel warmer and shrinks condensation risk dramatically. It also reduces the number of thermal bridges. Pair exterior insulation with furring strips that create a rain screen gap behind cladding. That vented space lets any incidental moisture drain and dry. Inside, you can still use thinner closed-cell foam or a smart vapor retarder depending on your climate strategy.
Where you must frame inside the box, avoid bare steel studs bridging through the insulation. Use wood furring or thermal break strips so you do not invite cold lines to print through your drywall with mildew freckles. Every screw and bracket is a potential cold spot, so plan those penetrations carefully and seal them.
Floors, Ceilings, And Openings
Floors are sneaky. The underside of a container floor can get cold enough to condense indoor moisture in winter or in cool nights after humid days. Insulate under the floor or add continuous insulation above it as part of a new subfloor assembly. Air seal all seams where the floor meets the walls. Ceilings can be even worse since warm air rises with your steam shower. Foam the roof panel thoroughly and pay extra attention to roof bows and edges.
Windows and doors deserve premium treatment. Use frames with thermal breaks and install them with proper flashing. Insulate the rough openings completely. A gorgeous all-metal frame that touches interior drywall and exterior steel with no break is a condensation magnet. Do not skimp on sealant. Water loves corners more than we do.
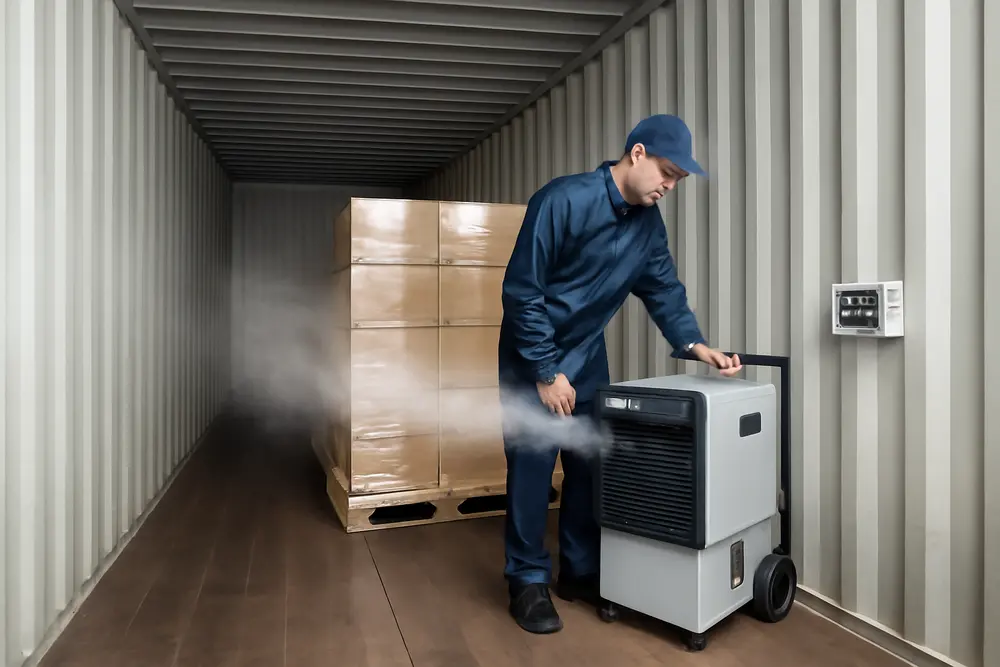
Container Dehumidification That Works
Insulation and vapor control keep humid air off cold steel. Dehumidification sets your indoor air to a target that mold hates. You do not need a desert. You need discipline. Keep RH between 40 and 50 percent most of the time. Short spikes during showers or cooking are fine as long as the space dries down quickly.
Target RH And Sizing
Choose dehumidifiers by pint-per-day rating at standard test conditions and the square footage or, better yet, the moisture load. A 20-foot container is roughly 160 to 180 square feet. A 40-foot is in the 320 to 360 square foot range. But size is not just area. It is climate, occupants, showers, cooking, and how airtight your build is. For a well-insulated, sealed 20-foot conversion, a 30 to 35 pint unit is often enough. For a busy 40-foot office with daily traffic, you might need 50 to 70 pints or a small whole-house style unit tied into a ducted system. In hot-humid regions, lean larger. In cold-dry zones, modest capacity is fine but make sure the unit has auto defrost or low-temperature operation if the space gets cool.
Look for Energy Star efficiency, a built-in humidistat, and a continuous drain. Buckets are for toddlers and mops. Route the condensate to a drain or use a condensate pump. If you integrate with HVAC, a dedicated whole-home dehumidifier gives you steady control without overcooling. We favor setups that can hold 45 percent RH reliably without turning your space into an icebox.
Placement And Operation
Dehumidifiers need airflow. Do not jam the unit into a closet unless it is ducted. Place it where air can circulate and where moisture is generated, like near bathrooms or kitchens, but not right next to a shower where it will inhale steam and short-cycle. In long containers, air can stratify and the far end might stay muggy. Use a quiet circulation fan to mix air so the dehumidifier sees the real average humidity. In cold seasons, warm moist air rises and may condense on the ceiling. Ceiling fans on low can help push that moisture toward the dehumidifier for removal.
Run the unit continuously in wet seasons with a setpoint around 45 percent. In shoulder seasons, watch the actual RH and dew point rather than guessing. Small containers change conditions quickly, so an inexpensive data-logging hygrometer pays for itself by preventing surprises.
Desiccants For Dead Zones
Desiccants like silica gel are perfect for micro-environments. Closets, under-bed drawers, instrument cases, and storage benches do not get much airflow. Put rechargeable silica gel canisters or packets in those zones to keep RH below 50 percent locally. Recharge them as indicated or swap them out. They are not a substitute for a real dehumidifier, but they clean up the corners that your compressor unit cannot reach.
Ventilation Without Soaking The Box
Air changes are healthy, but containers turn into fog machines if you ventilate without a plan. The goal is to exhaust moisture at the source, bring in balanced outdoor air when needed, and avoid uncontrolled infiltration that stuffs humid air into your wall cavities.
Spot Exhaust In Wet Zones
Bathroom fans should be quiet so people actually use them, sized for the volume of the space, and ducted to the outside with smooth, sealed ductwork. Run them during showers and for at least 20 minutes after. Kitchen range hoods should be ducted outside, not recirculating, and should actually get used when boiling, sautéing, or doing anything that fogs your glasses. If your container kitchen is open to the rest of the space, a stronger hood on a short run is worth it.
Balanced Ventilation With ERV Or HRV
In cold climates, an HRV helps remove moist indoor air while keeping most of the heat. That reduces condensation risk on cold nights. In hot-humid climates, an ERV is often better because it reduces incoming humidity while bringing in fresh air. Either unit should be ducted and commissioned so you do not create negative pressure strong enough to suck moist outdoor air through cracks. Set them to a steady low rate, then boost during occupancy or higher moisture events.
Air Sealing And Pressure
Air sealing makes everything else work. Seal wall-to-floor joints, roof seams, window perimeters, and every penetration. Use high-quality sealants and tapes that bond to steel and foam. Keep your building slightly balanced or slightly positive in pressure, especially in hot-humid regions, so you do not pull in outdoor moisture through gaps. Test with a blower door if possible. If that sounds nerdy, it is, and it works.
Monitoring, Maintenance, And Reality Checks
The container that stays dry is the container that gets checked. Put hygrometers in multiple spots. If you can, use sensors that log data and alert you when RH rises above 55 percent or when temperature drops to dew point range. Inspect hidden areas seasonally: under window sills, behind furniture against exterior walls, inside closets that back up to steel, and the underside of floors. Look for early rust blooms and peppery mold flecks. Fix tiny leaks fast. Once water gets between foam and steel, it is hard to dry.
Keep dehumidifiers clean. Wash or replace filters, check the drain line for clogs, and make sure the defrost cycle works. If you use desiccants in cabinets and storage nooks, recharge them on a schedule. If the unit is off for a while in a humid climate, expect a swamp when you power it back up. Consider a smart plug that lets you monitor run time and alerts you if the machine stops.
Quick Fixes For Common Symptoms
| Symptom | Likely Cause | Better Fix |
|---|---|---|
| Water beads on interior steel | Thermal bridge and no vapor control | Closed-cell foam on steel and continuous insulation |
| Mildew behind furniture | Poor airflow and cold wall surface | Space furniture off walls and improve mixing airflow |
| Musty closet odor | High RH and stagnant air | Small desiccants plus ducted fresh air or dry-down cycles |
| Drips at roof seams | Condensation at uninsulated joint | Spray foam coverage over seams and air sealing |
| Foggy windows daily | High indoor RH and cold frames | Lower RH to 45 percent and use thermal break frames |
Design Moves That Actually Work
Start with a continuous air barrier. In a container, closed-cell spray foam on the steel gives you that air seal while also delivering the vapor control layer. If your climate favors exterior insulation, put rigid foam or mineral wool outside the steel and tie it into a rain screen. Use thermal break framing for windows and doors, and flash them like you are allergic to leaks. Inside walls, do not add interior polyethylene unless your climate and assembly are designed for it. With closed-cell foam on the steel, extra interior plastic can trap moisture where you do not want it.
Integrate ventilation and container dehumidification into your mechanical plan. A small ducted dehumidifier can tie into your supply ductwork and run independently of cooling. An ERV or HRV runs low and steady so the box never gets stuffy or wet. Size bathroom and kitchen exhaust to the space and use backdraft dampers at terminations so wind does not push humidity back in. All penetrations through the shell get sealed, then sealed again after movement season.
On the floor assembly, either insulate at the underside with rigid boards and a protected finish or build up inside with continuous insulation above the subfloor. Avoid isolated foam blocks that leave steel crossmembers exposed as cold stripes. The same rule applies at the ceiling. Keep insulation continuous and cover the ribs.
Climate Notes You Will Thank Me For
Cold climates want the interior steel kept warm. Closed-cell foam on the steel plus additional insulated layers inside or outside works well. Use an HRV to reduce winter moisture while keeping heat. Watch for cold snaps that push the interior foam surface near dew point and let your dehumidifier shoulder the load at 45 percent RH.
Hot-humid climates want to stop outdoor steam from crashing the party. Keep the container slightly positive in pressure if you run a central system, use an ERV to limit incoming humidity, and run a dehumidifier to maintain 45 percent RH without overcooling the space. Make sure any makeup air is conditioned or dehumidified. Cold drinks sweat in summer. So does steel.
Mixed climates require flexibility. Do not lock yourself into a one-season setup. Use a smart controller for ventilation and dehumidification so you can bias toward exhaust in winter and balance or supply in summer.
Testing And Materials You Should Not Ignore
If you are working with an existing container floor, remember many original plywood floors were treated for international shipping. When converting to living or working space, consider replacing or encapsulating that floor with appropriate coatings and new subfloor layers. We test suspect materials regularly and recommend erring on the side of safety. Any previous leaks or visible mold growth on surfaces need real remediation. Clean, dry, and verify with moisture meters before you cover anything up. Encapsulation without drying is just an expensive terrarium.
How To Keep It Dry After Move-In
Live like a humidity ninja. Use lids when cooking, turn on the range hood, and actually use the bathroom fan. Hang wet coats near an exhaust point or take them straight outside. Do not dry laundry indoors without vented equipment. Set the dehumidifier to 45 percent and resist the urge to tinker every hour. Move large furniture off exterior walls an inch or two to let air circulate. Check under beds and inside benches monthly. If anything smells like a wet basement, it probably is. Track RH with two sensors in different zones so you do not chase phantom readings.
Realistic Budget Priorities
Spend first on the invisible stuff that makes everything else work. Proper closed-cell foam coverage is non-negotiable. Quality windows and doors with thermal breaks come next. A reliable dehumidifier with continuous drain is not optional in humid climates. An ERV or HRV is your quiet partner that pays you back every season. Fancy finishes look great, but if the box sweats behind them, you are paying twice. Choose mold-resistant interior finishes, seal cut edges, and caulk joints where air and moisture would love to loiter.
What If You Already See Mold?
Stop adding moisture and start drying immediately. Run a dehumidifier full-time, keep the setpoint near 45 percent, and increase ventilation where practical. Then investigate. Lift baseboards, peek behind accessible panels, and scan for wet areas. If growth is more than a small, isolated patch or if it is tied to a hidden condensation path, bring in a pro for inspection and testing. In steel assemblies, damage often hides in insulation seams. We remove suspect materials, treat the area, correct the condensation cause, and verify dryness before rebuilding. If you do not remove the cause, the mold will RSVP yes to your very next cold night.
FAQs
Do I Need A Vapor Barrier Or A Vapor Retarder?
You need a vapor control strategy. In most container builds, closed-cell spray foam on the steel acts as both air barrier and a strong vapor retarder. That is usually enough. Slapping interior polyethylene on top of that can trap moisture depending on climate. If you do not use closed-cell foam, use a smart vapor retarder that changes permeability with humidity, paired with airtight construction. The best choice depends on your climate and assembly, but doubling up on class I barriers is how you build a mold sandwich.
Can I Rely On Passive Vents Only?
Passive vents help, but they will not manage humidity during showers, cooking, or sticky summer weather. You still need controlled exhaust in wet zones and often a dedicated dehumidifier. Passive vents also allow wind-driven moisture to enter if not designed correctly. Use them as part of a plan, not the whole plan.
What RH Should I Target Year-Round?
Hold indoor RH between 40 and 50 percent. That range keeps most mold inactive, reduces condensation on cold surfaces, and still feels comfortable. Short spikes above 55 percent are fine if you dry down quickly afterward. If your windows sweat regularly, your average RH or surface temperatures need attention.
Where Should I Put The Dehumidifier?
Place it where air can move freely and where you see the highest sustained humidity. Avoid stuffing it in closets or corners unless it is ducted. In a long container, center placement with a small circulation fan often outperforms doorways or ends. Always use a continuous drain and clean the filters.
Will Rigid Foam Boards Work Without Spray Foam?
They can, but only with a continuous air barrier and careful detailing to eliminate gaps against the steel. Any air space that contacts cold steel can condense. Adhered, taped, and sealed rigid foam with staggered seams can work, especially when paired with exterior insulation. If you skip the air seal, you are rebuilding later.